【高阶运维必看】Docker-LangGraph日志实时监控方案(仅限内部使用的3种方法)
2025/12/17 14:36:41
简介
文章详细介绍了构建自进化AI智能体的训练架构,涵盖强化学习算法、策略建模和分布式训练等关键技术。通过定义训练基础、构建分布式流水线、添加强化学习层、设计动态奖励系统和多阶段训练循环,实现智能体在动态环境中的学习和适应。文章提供了多智能体科学系统的实现案例,展示了如何通过实时反馈和奖励机制使智能体不断改进和进化。
智能体系统(Agentic systems),无论是为工具使用还是为推理而设计,都依赖于提示词来指导其行动。但提示词是静态的,它们仅提供步骤,无法自我改进。真正的智能体训练源于系统在动态环境中学习、适应和协作的方式。
在智能体架构中,每个子智能体都有不同的目标,这意味着单一算法无法适用于所有智能体。为了使这些系统更有效,我们需要一个集成了推理、奖励和实时反馈的完整训练架构。一个典型的智能体系统训练架构涉及多个相互关联的组件,包括:
智能体训练架构(由 Fareed Khan 创建)
在本博客中,我们将……
构建一个完整的多智能体系统,结合推理、协作和强化学习(Reinforcement Learning, RL),使智能体能够通过实时反馈和奖励进行适应和改进。
当我们开始构建一个生产级(production-grade)AI 系统时,我们不会立即从算法入手,而是首先为整个系统奠定坚实的基础。这个初始设置至关重要,我们在此做出的每一个选择,从安装的库到获取的数据,都将决定我们最终训练出的智能体的可靠性和可复现性。
因此,在本节中,我们将执行以下操作:
AgentState,这是实现协作和推理的共享内存。首先,我们需要设置我们的 Python 环境。我们将使用uv而非简单的pip install,因为它是一个快速而现代的包管理器,能确保我们的环境既能快速搭建又具有高度可复现性,适合生产环境。
我们还将为agent-lightning安装特定的verl扩展用于我们的 PPO 算法,以及apo(Asynchronous Policy Optimization) 和unsloth用于高效的 SFT,这些对于我们高级的分层训练策略至关重要。
print("Updating and installing system packages...")# We first update the system's package list and install 'uv' and 'graphviz'.# 'graphviz' is a system dependency required by LangGraph to visualize our agentic workflows.!apt-get update -qq && apt-get install -y -qq uv graphvizprint("\nInstalling packages...\n")# Here, we use 'uv' to install our Python dependencies.# We install the '[verl,apo]' extras for Agent-Lightning to get the necessary components for PPO and other advanced RL algorithms.# '[unsloth[pt231]]' provides a highly optimized framework for Supervised Fine-Tuning, which we'll use for our Junior Researchers.!uv pip install -q -U "langchain""langgraph""langchain_openai""tavily-python""agentlightning[verl,apo]""unsloth[pt231]""pandas""scikit-learn""rich""wandb""datasets""pyarrow"print("Successfully installed all required packages.")让我们开始安装过程……
#### OUTPUT ####Updating and installing system packages......Installing packages...Resolved 178 packages in 3.12s...+ agentlightning==0.2.2+ langchain==0.2.5+ langgraph==0.1.5+ unsloth==2024.5+ verl==0.6.0...Successfully installed all required packages.通过安装graphviz,我们启用了LangGraph的可视化功能,这对于后续调试我们复杂的智能体社群将非常有价值。
更重要的是,安装带有verl和unsloth扩展的agentlightning为我们提供了分层策略所需的高性能特定训练后端。
我们现在有了一个稳定而完整的基础。现在可以开始预处理训练数据了。
每个机器学习系统都需要训练数据,或者至少需要一些初始观察才能开始自学习。
我们的智能体不能孤立地进行推理;它们需要访问丰富的、特定领域的信息。
预处理知识库数据(由 Fareed Khan 创建)
一个静态的、硬编码的事实列表过于简单。为了构建一个现实且具有挑战性的研究环境,我们将从 PubMedQA 数据集 中提取我们的知识库,特别是利用其标记子集 pqa_l。
它包含真实的生物医学问题、提供必要上下文的原始科学摘要,以及由人类专家确定的最终**‘是/否/可能’**答案。这种结构不仅为我们的智能体提供了一个丰富的信息来源进行搜索,还提供了一个基准真相(ground truth),我们可以用它来为我们的强化学习循环计算奖励。
首先,让我们定义一个简单的TypedDict来结构化每个任务。这能确保我们的数据在整个流水线中保持干净和一致。
from typing import List, TypedDict# A TypedDict provides a clean, structured way to represent each research task.# This makes our code more readable and less prone to errors from using plain dictionaries.class ResearchTask(TypedDict): id: str # The unique PubMed ID for the article goal: str # The research question our agent must investigate context: str # The full scientific abstract providing the necessary evidence expected_decision: str # The ground truth answer ('yes', 'no', or 'maybe')我们基本上是使用TypedDict创建了一个ResearchTask蓝图。这不仅仅是一个普通的字典,它是一个强制执行特定数据结构的契约。现在,每个任务都将一致地拥有id、goal、context和expected_decision。这种严格的类型定义是一种最佳实践,可以防止后续的错误,确保我们系统的每个组件都确切地知道期望什么样的数据。
定义好数据结构后,我们现在可以编写一个函数来从 Hugging Face Hub 下载数据集,将其处理成我们的ResearchTask格式,并分割成训练集和验证集。一个独立的验证集对于客观评估我们智能体在训练后的性能至关重要。
from datasets import load_datasetimport pandas as pddefload_and_prepare_dataset() -> tuple[List[ResearchTask], List[ResearchTask]]: """ Downloads, processes, and splits the PubMedQA dataset into training and validation sets. """ print("Downloading and preparing PubMedQA dataset...") # Load the 'pqa_l' (labeled) subset of the PubMedQA dataset. dataset = load_dataset("pubmed_qa", "pqa_l", trust_remote_code=True) # Convert the training split to a pandas DataFrame for easier manipulation. df = dataset['train'].to_pandas() # This list will hold our structured ResearchTask objects. research_tasks = [] # Iterate through each row of the DataFrame to create our tasks. for _, row in df.iterrows(): # The 'CONTEXTS' field is a list of strings; we join them into a single block of text. context_str = " ".join(row['CONTEXTS']) # Create a ResearchTask dictionary with the cleaned and structured data. task = ResearchTask( id=str(row['PUBMED_ID']), goal=row['QUESTION'], context=context_str, expected_decision=row['final_decision'] ) research_tasks.append(task) # We perform a simple 80/20 split for our training and validation sets. train_size = int(0.8 * len(research_tasks)) train_set = research_tasks[:train_size] val_set = research_tasks[train_size:] print(f"Dataset downloaded and processed. Total samples: {len(research_tasks)}") print(f"Train dataset size: {len(train_set)} | Validation dataset size: {len(val_set)}") return train_set, val_set# Let's execute the function.train_dataset, val_dataset = load_and_prepare_dataset()我们刚刚编写的load_and_prepare_dataset函数是我们的数据摄取流水线。它自动化了获取知识库的整个过程:连接到 Hugging Face Hub,下载原始数据,最重要的是,将其从通用的 DataFrame 转换为我们自定义的ResearchTask对象的干净列表。
80/20 的划分是标准的机器学习实践,它为我们提供了一个庞大的数据集用于训练(
train_set),以及一个独立的、未见过的数据集(val_set)用于后续测试我们的智能体知识泛化的程度。
数据加载后,检查一个样本总是一个好习惯。这有助于我们确认解析逻辑是否正确,并让我们对智能体将面临的挑战类型有一个直观感受。我们将编写一个小工具函数,用一个清晰、易读的表格来显示几个例子。
from rich.console import Consolefrom rich.table import Tableconsole = Console()defdisplay_dataset_sample(dataset: List[ResearchTask], sample_size=5): """ Displays a sample of the dataset in a rich, formatted table. """ # Create a table for display using the 'rich' library for better readability. table = Table(title="PubMedQA Research Goals Dataset (Sample)") table.add_column("ID", style="cyan") table.add_column("Research Goal (Question)", style="magenta") table.add_column("Expected Decision", style="green") # Populate the table with the first few items from the dataset. for item in dataset[:sample_size]: table.add_row(item['id'], item['goal'], item['expected_decision']) console.print(table)display_dataset_sample(train_dataset)这个display_dataset_sample函数是我们的健全性检查。通过使用rich库创建一个格式化的表格,我们可以快速清晰地验证加载数据的结构。这比仅仅打印原始字典要有效得多。以这种方式展示数据,确认了我们的load_and_prepare_dataset函数正确地为每个任务提取了ID、goal和expected_decision。
让我们看一下我们刚刚编写的上述函数的输出。
#### OUTPUT ####Downloading and preparing PubMedQA dataset...Dataset downloaded and processed. Total samples: 1000Train dataset size: 800 | Validation dataset size: 200--- Sample 0 ---ID: 11843333Goal: Do all cases of ulcerative colitis in childhood need colectomy?Expected Decision: yesContext (first 200 chars): A retrospective review of 135 children with ulcerative colitis was performed to determin ...我们已经将原始的 PubMedQA 数据转换成了一个干净、结构化的ResearchTask对象列表,并分成了训练集和验证集。此表中的每一行都代表一个完整的研究挑战,我们可以将其输入到智能体的rollout方法中。
Research Goal将作为初始提示,而Expected Decision将作为计算最终奖励信号的基准真相。我们的智能体现在有了一个世界级的、现实的知识库可供学习。
一直在更新,更多的大模型学习和面试资料已经上传带到CSDN的官方了,有需要的朋友可以扫描下方二维码免费领取【保证100%免费】👇👇
在获取并结构化数据之后,我们现在需要设计我们智能体社群的**“神经系统”。这是共享内存,或称状态**,它将使我们多样化的智能体群体能够协作、传递信息并在彼此的工作基础上进行构建。在LangGraph中,这个共享内存由一个中央状态对象管理。
对于像我们这样复杂的系统,一个简单的字典会过于脆弱。因此,我们将使用 Python 的
TypedDict构建一个嵌套的、分层的AgentState。
AgentState(由 Fareed Khan 创建)
这种方法为我们智能体的整个认知过程提供了一个机器可读的蓝图。我们状态中的每个字段都将代表研究工作流的一个不同阶段,从初级研究员生成的初始假设到最终经过同行评审的方案。
以下是我们将要做的:
JuniorResearch、Protocol和ReviewDecision创建更小的TypedDict类。AgentState中,它将保存单次研究运行的所有信息。sender字段,这是一个关键组件,允许我们构建健壮的 ReAct 风格循环,其中工具结果被路由回正确的智能体。首先,让我们为初级研究员的输出定义数据结构。这确保了他们生成的每个假设都具有一致的格式。
from typing import List, TypedDict, Literalfrom langchain_core.messages import BaseMessage# This defines the structure for a single hypothesis from a Junior Researcher.# It captures the core idea, the evidence found, and which agent proposed it.class JuniorResearch(TypedDict): hypothesis: str supporting_papers: List[str] agent_name: str # To track which junior researcher proposed it我们基本上是为**“假设提交”**创建了一个蓝图。JuniorResearch类使用TypedDict来强制每个提交都必须包含一个hypothesis字符串、一个supporting_papers列表和agent_name。这种结构对主管智能体非常重要,因为它保证了它将收到一组格式一致的提案,每个提案都有明确的出处。
接下来,我们将为实验方案定义结构。这是我们高级研究员的主要输出,需要详细且可操作。
# This defines the structure for the final experimental protocol.# It's a detailed, actionable plan.class Protocol(TypedDict): title: str steps: List[str] safety_concerns: str budget_usd: floatProtocol类规范了科学实验的关键组成部分。通过要求title、steps列表、safety_concerns部分和budget_usd,我们正在指导我们的高级研究员智能体思考其提案的实际细节。
这种结构化的输出远比一个简单的文本块更有价值,并将成为我们最终奖励计算的基础。
现在,让我们为评审委员会的反馈创建结构。这对于我们的修订循环至关重要,因为它需要既清晰又机器可读。
# This defines the structured feedback from our review agents.# It forces a clear decision, a severity level, and constructive feedback.class ReviewDecision(TypedDict): decision: Literal['APPROVE', 'REVISE'] critique_severity: Literal['CRITICAL', 'MAJOR', 'MINOR'] feedback: str在这里,我们设计了ReviewDecision类来捕捉一份评论的细致输出。Literal的使用是一个关键的工程设计:
APPROVE或REVISE)。CRITICAL、MAJOR或MINOR)。通过这种方式,我们允许我们的LangGraph路由器决定是应该将方案发回进行重大重写还是小幅调整。
最后,我们可以将这些较小的结构组装到我们的主AgentState中。这将是追踪研究运行期间发生的所有事情的单一、全面的对象。
from typing import Annotated# This is the master state dictionary that will be passed between all nodes in our LangGraph.classAgentState(TypedDict): # The 'messages' field accumulates the conversation history. # The 'lambda x, y: x + y' tells LangGraph how to merge this field: by appending new messages. messages: Annotated[List[BaseMessage], lambda x, y: x + y] research_goal: str# The initial high-level goal from our dataset. sender: str # Crucial for ReAct: tracks which agent last acted, so tool results can be sent back to it. turn_count: int # A counter to prevent infinite loops in our graph. # Junior Researcher Team's output (accumulates from parallel runs) initial_hypotheses: List[JuniorResearch] # Supervisor's choice selected_hypothesis: JuniorResearch supervisor_justification: str # Senior Researcher Team's output refined_hypothesis: str experimental_protocol: Protocol # Review Board's output peer_review: ReviewDecision safety_review: ReviewDecision # Principal Investigator's final decision final_protocol: Protocol final_decision: Literal['GO', 'NO-GO'] final_rationale: str # The final evaluation score from our reward function final_evaluation: dict我们现在已经成功定义了我们智能体社群的整个认知架构。
信息的流动是清晰的:生成initial_hypotheses,选择其中一个作为selected_hypothesis,将其完善为experimental_protocol,经过peer_review和safety_review,最终得出final_decision。
sender字段尤其重要。
在一个 ReAct(推理-行动,Reason-Act)循环中,一个智能体决定使用一个工具。工具运行后,系统需要知道将结果返回给哪个智能体。
通过在每次智能体行动时更新sender字段,我们创建了一个明确的返回地址,从而实现了这种复杂的、来回往复的推理模式。有了这个状态定义,我们的图现在有了一个坚实的内存结构。
我们的智能体现在有了复杂的内存(AgentState),但要进行研究,它们需要访问外部世界,或者用更技术的术语来说,是外部知识库(external knowledgebase)。
一个没有工具的智能体只是一个对话者,一个拥有工具的智能体则成为一个能够收集实时、特定领域信息的强大行动者。
科学工具(由 Fareed Khan 创建)
在本节中,我们将为我们的智能体社群构建一个ScientificToolkit。这个工具包将提供一套专门的函数,我们的智能体可以调用这些函数来执行基本的研究任务。
以下是我们将要做的:
TavilySearchResults工具,让我们的智能体能够搜索 PubMed 和 ClinicalTrials.gov 以获取最新的科学文献。**@tool**装饰器:使用 LangChain 的@tool装饰器,使这些 Python 函数能够被我们由 LLM 驱动的智能体发现和调用。首先,让我们定义一个类来容纳我们所有的工具。将它们分组在一个类中是组织和状态管理(如管理 API 客户端)的良好实践。
from langchain_core.tools import toolfrom langchain_community.tools.tavily_search import TavilySearchResultsclassScientificToolkit: def__init__(self): # Initialize the Tavily search client, configured to return the top 5 results. self.tavily = TavilySearchResults(max_results=5) # This is a mock database simulating an internal resource for protein information. self.mock_protein_db = { "amyloid-beta": "A key protein involved in the formation of amyloid plaques in Alzheimer's.", "tau": "A protein that forms neurofibrillary tangles inside neurons in Alzheimer's.", "apoe4": "A genetic risk factor for Alzheimer's disease, affecting lipid metabolism in the brain.", "trem2": "A receptor on microglia that, when mutated, increases Alzheimer's risk.", "glp-1": "Glucagon-like peptide-1, a hormone involved in insulin regulation with potential neuroprotective effects." } # This is a second mock database, this time for gene functions. self.mock_go_db = { "apoe4": "A major genetic risk factor for Alzheimer's disease, involved in lipid transport and amyloid-beta clearance.", "trem2": "Associated with microglial function, immune response, and phagocytosis of amyloid-beta." }我们现在已经为我们的ScientificToolkit搭建好了基础。让我们快速理解一下……
__init__方法初始化了我们的实时网络搜索工具 (Tavily)。mock_protein_db,mock_go_db) 来模拟内部的专有数据库。现在,让我们定义实际的工具方法。每个方法都将是我们希望赋予智能体的特定能力。我们将从 PubMed 搜索工具开始。
@tool def pubmed_search(self, query: str) -> str: """Searches PubMed for biomedical literature. Use highly specific keywords related to genes, proteins, and disease mechanisms.""" console.print(f"--- TOOL: PubMed Search, Query: {query} ---") # We prepend 'site:pubmed.ncbi.nlm.nih.gov' to the query to restrict the search to PubMed. return self.tavily.invoke(f"site:pubmed.ncbi.nlm.nih.gov {query}")我们首先定义了我们的第一个工具pubmed_search。来自 LangChain 的@tool装饰器为我们简化了工作,它自动将这个 Python 函数转换成一个 LLM 能够理解并决定调用的结构化工具。
接下来,我们将创建一个类似的工具,用于搜索临床试验。
@tool def clinical_trials_search(self, query: str) -> str: """Searches for information on clinical trials related to specific drugs or therapies.""" console.print(f"--- TOOL: Clinical Trials Search, Query: {query} ---") # This tool is focused on ClinicalTrials.gov to find information about ongoing or completed studies. return self.tavily.invoke(f"site:clinicaltrials.gov {query}")这个clinical_trials_search工具是另一个专业化的实时数据工具的例子。通过将搜索限制在clinicaltrials.gov,我们为智能体提供了一种专注的方式来查找有关药物开发流程和治疗干预的信息,这与通常在 PubMed 摘要中找到的信息类型不同。
现在,让我们实现与我们的模拟内部数据库交互的工具。
@tool defprotein_database_lookup(self, protein_name: str) -> str: """Looks up information about a specific protein in our mock database.""" console.print(f"--- TOOL: Protein DB Lookup, Protein: {protein_name} ---") # This simulates a fast lookup in a proprietary, internal database of protein information. returnself.mock_protein_db.get(protein_name.lower(), "Protein not found.") @tool defgene_ontology_lookup(self, gene_symbol: str) -> str: """Looks up the function and pathways associated with a specific gene symbol in the Gene Ontology database.""" console.print(f"--- TOOL: Gene Ontology Lookup, Gene: {gene_symbol.upper()} ---") # This simulates a query to another specialized internal database, this time for gene functions. result = self.mock_go_db.get(gene_symbol.lower(), f"Gene '{gene_symbol}' not found in ontology database.") console.print(f"Gene '{gene_symbol.upper()}' lookup result: {result}") return result这两个函数protein_database_lookup和gene_ontology_lookup展示了如何将智能体与内部或专有数据源集成。
尽管在这个演示中我们使用的是简单的字典,但在真实系统中,这些函数可能包含连接到 SQL 数据库、私有 API 或专业生物信息学库(例如医院的私有数据库)的逻辑。
最后,让我们实例化我们的工具包,并将所有工具函数整合到一个列表中,这样我们就可以方便地将其传递给我们的智能体运行器。
# Instantiate our toolkit class.toolkit = ScientificToolkit()# Create a list that holds all the tool functions we've defined.all_tools = [toolkit.pubmed_search, toolkit.clinical_trials_search, toolkit.protein_database_lookup, toolkit.gene_ontology_lookup]print("Scientific Toolkit with live data tools defined successfully.")# Test the new gene_ontology_lookup tool to confirm it's working.toolkit.gene_ontology_lookup.invoke("APOE4")让我们运行这段代码,看看我们工具包的输出是什么样的……
#### OUTPUT ####Scientific Toolkit with live data tools defined successfully.--- TOOL: Gene Ontology Lookup, Gene: APOE4 ---Gene 'APOE4' lookup result: A major genetic risk factor for Alzheimers disease, involved in lipid transport and amyloid-beta clearance.我们可以看到,输出确认了我们的ScientificToolkit已经成功实例化,并且我们的新gene_ontology_lookup工具工作正常。
all_tools列表现在是一个完整的、可移植的能力集合,我们可以将它绑定到我们的任何一个智能体上。通过这种方式,我们正在积极地为我们的智能体系统寻找并集成来自多个来源的信息,将它们从简单的推理者转变为活跃的研究者。
随着我们的基础组件——安全的环境、数据集、分层的AgentState和强大的ScientificToolkit——都已就位,我们现在准备好构建智能体本身了。
在这一步,我们将从定义数据结构转向工程化将要执行研究的认知实体,简单来说,我们将构建我们多智能体系统的核心组件。
子智能体系统(由 Fareed Khan 创建)
在本节中,我们将使用LangGraph来设计和编排我们的多智能体社群。
为了模拟真实的工作流程,我们将创建一个专家团队,每个成员都有特定的角色,并由精心选择的开源模型提供支持。
以下是我们将要做的:
LangGraph将这些智能体连接在一起,实现先进的 ReAct 逻辑和一个多层次的修订循环,以创建一个健壮的、循环的工作流程。高级智能体设计的一个关键原则是,并非所有任务都是平等的。为每项工作都使用一个单一的、巨大的模型是低效且昂贵的。因此,我们将策略性地从 Hugging Face Hub 中为我们研究团队内的不同角色分配不同的开源模型。
这种**“为合适的任务选择合适的模型”**的方法是构建生产级、成本效益高的智能体系统的基石。
多智能体系统(由 Fareed Khan 创建)
我们需要定义 LLM 配置。我们将为初级研究员的创造性头脑风暴使用一个小型、快速的模型,为我们将用PPO 微调的高级研究员预留一个更强大模型的占位符,并为关键的评审任务使用一个能力很强的混合专家模型(mixture-of-experts model)。
import osfrom langchain_openai import ChatOpenAIfrom langchain_core.prompts import ChatPromptTemplate, MessagesPlaceholder# We will use different open-source models for different roles to optimize performance and cost.# The 'openai_api_base' will be dynamically set by the LLMProxy during training,# pointing to a local server (like Ollama or vLLM) instead of OpenAI's API.junior_researcher_llm = ChatOpenAI( model="Qwen/Qwen2-1.5B-Instruct", # A small, fast model for creative, parallel brainstorming. temperature=0.7, openai_api_base="http://localhost:11434/v1", # Assuming an Ollama server is running locally. openai_api_key="ollama")supervisor_llm = ChatOpenAI( model="Qwen/Qwen2-1.5B-Instruct", # The same small model is sufficient for the structured selection task. temperature=0.0, openai_api_base="http://localhost:11434/v1", openai_api_key="ollama")# This is a special placeholder. During training, the VERL algorithm will serve the Llama-3 model# under this logical name via the Agent-Lightning LLMProxy.senior_researcher_llm = ChatOpenAI( model="senior_researcher_llm", # A logical name, not a real model endpoint initially. temperature=0.1, openai_api_base="http://placeholder-will-be-replaced:8000/v1", openai_api_key="dummy_key")# For the critical review and final decision stages, we use a more powerful model.review_board_llm = ChatOpenAI( model="mistralai/Mixtral-8x7B-Instruct-v0.1", # A powerful Mixture-of-Experts model for nuanced evaluation. temperature=0.0, openai_api_base="http://localhost:11434/v1", openai_api_key="ollama")print("Agent personas and open-source LLM configurations are defined.")确保你已经拉取了相应的模型,并通过 ollma/vllm 提供服务。
我们现在已经定义了我们研究团队的**“硬件”**。
Qwen2-1.5B分配给初级角色,我们实现了快速、并行和低成本的创意构思。senior_researcher_llm现在被明确地作为一个逻辑占位符,这是训练的一个关键概念。Agent-Lightning将拦截对这个模型名称的调用,并将它们路由到我们经过 PPO 训练的模型,使我们能够在不影响系统其余部分的情况下更新其策略。Mixtral模型确保了批判和评估步骤以最高水平的审查标准进行。接下来,我们需要一个标准化的方法来将模型、系统提示和一组工具组合成一个可运行的智能体。我们将为此创建一个简单的工厂函数。
def create_agent_runner(llm, system_prompt, tools): """A factory function to create a runnable agent executor.""" # The prompt consists of a system message, and a placeholder for the conversation history. prompt = ChatPromptTemplate.from_messages([ ("system", system_prompt), MessagesPlaceholder(variable_name="messages"), ]) # We bind the tools to the LLM, making them available for the agent to call. return prompt | llm.bind_tools(tools)这个create_agent_runner函数虽然小,但在这里却很重要。它规范了我们构建智能体的方式。通过创建一个可重用的**“工厂”**,我们确保系统中的每个智能体都以一致的方式构建,接收一个定义其角色的特定system_prompt、一个提供其推理能力的llm,以及一个它能使用的tools列表。这使得我们的主图构建代码更清晰、更易于管理。
最后,我们将为我们智能体社群中的每个角色定义具体的系统提示。这些提示是运行在我们 LLM “硬件”上的“软件”,引导每个智能体的行为,并定义其具体的职责和输出格式。
# This is holding the detailed system prompts for each agent role.prompts = { "Geneticist": "You are a geneticist specializing in Alzheimer's. Propose a hypothesis related to genetic factors. Use tools to find supporting evidence. Respond with a JSON object: {'hypothesis': str, 'supporting_papers': List[str]}.", "Pharmacologist": "You are a pharmacologist. Propose a drug target hypothesis. Use tools to find clinical trial data. Respond with a JSON object: {'hypothesis': str, 'supporting_papers': List[str]}.", "Neurologist": "You are a clinical neurologist. Propose a systems-level neurobiology hypothesis. Use tools to find papers on brain pathways. Respond with a JSON object: {'hypothesis': str, 'supporting_papers': List[str]}.", "Supervisor": "You are a research supervisor. Review the hypotheses and select the most promising one. Justify your choice based on novelty, feasibility, and impact. Return a JSON object: {'selected_hypothesis_index': int, 'justification': str}.", "HypothesisRefiner": "You are a senior scientist. Deepen the selected hypothesis with more literature review, refining it into a specific, testable statement. Return a JSON object: {'refined_hypothesis': str}.", "ProtocolDesigner": "You are a lab manager. Design a detailed, step-by-step experimental protocol to test the refined hypothesis. Be specific about methods, materials, and controls. Return a JSON object: {'title': str, 'steps': List[str], 'safety_concerns': str, 'budget_usd': float}.", "PeerReviewer": "You are a critical peer reviewer. Find flaws in the protocol. Be constructive but rigorous. Return a JSON object: {'decision': 'APPROVE'|'REVISE', 'critique_severity': 'CRITICAL'|'MAJOR'|'MINOR', 'feedback': str}.", "SafetyOfficer": "You are a lab safety officer. Review the protocol for safety, regulatory, and ethical concerns. Be thorough. Return a JSON object: {'decision': 'APPROVE'|'REVISE', 'critique_severity': 'CRITICAL'|'MAJOR'|'MINOR', 'feedback': str}.", # Note: I corrected a typo from 'safety_review' to 'feedback' for consistency "PrincipalInvestigator": "You are the Principal Investigator. Synthesize the protocol and reviews into a final document. Make the final GO/NO-GO decision and provide a comprehensive rationale. Return a JSON object: {'final_protocol': Protocol, 'final_decision': 'GO'|'NO-GO', 'final_rationale': str}."}我们现在已经完全定义了我们的 AI 科学家阵容。每个智能体都通过其prompt被赋予了特定的角色,通过其llm被赋予了推理引擎,并通过tools被赋予了一套能力。
这些提示中的一个关键细节是要求以特定的 JSON 对象进行响应。这种结构化输出对于在我们分层的AgentState中可靠地更新工作流从一个智能体传递到下一个智能体至关重要。我们的工作团队现在已经准备好被组装成一个功能齐全的团队。
现在我们已经定义了我们的专家智能体团队,我们需要建造一个它们可以协作的实验室。这是LangGraph的工作。我们现在将把我们的智能体组装成一个功能性的、循环的工作流,创建一个StateGraph来定义我们研究团队每个成员之间的信息和控制流。
ReAct 逻辑简化图(由 Fareed Khan 创建)
这不会是一个简单的线性流水线……
为了模拟真实的研究过程,我们需要实现复杂的逻辑,包括用于修订的反馈循环和用于工具使用的健壮机制。
在本节中,我们将执行以下操作……
LangGraph节点,该节点能正确更新我们的AgentState。StateGraph并生成一个可视化图像,以清晰地了解我们智能体的认知架构。首先,我们需要一种从我们的智能体运行器创建图节点的方法。我们将创建一个辅助函数,它接受智能体的名称及其可运行的执行器,并返回一个可以作为节点添加到我们的图中的函数。这个节点函数将处理更新AgentState中的turn_count和sender字段。
from langgraph.graph import StateGraph, START, ENDfrom langgraph.prebuilt import ToolNodefrom langchain_core.messages import HumanMessage, BaseMessageimport jsonMAX_TURNS = 15# A safeguard to prevent our graph from getting stuck in an infinite loop.# This is a helper function, a "factory" that creates a node function for a specific agent.defcreate_agent_node(agent_name: str, agent_runner): """Creates a LangGraph node function for a given agent runner.""" defagent_node(state: AgentState) -> dict: # Print a console message to trace the graph's execution path. console.print(f"--- Node: {agent_name} (Turn {state['turn_count']}) ---") # Increment the turn count as a safety measure. state['turn_count'] += 1 # Invoke the agent runner with the current state. result = agent_runner.invoke(state) # We need to handle the structured JSON output from our review agents specifically. if agent_name in ["PeerReviewer", "SafetyOfficer"]: try: # The agent's output is a JSON string in the 'content' of the AIMessage. content = json.loads(result.content) # We update the correct field in our AgentState based on which reviewer ran. if agent_name == "PeerReviewer": state['peer_review'] = content else: state['safety_review'] = content # The key here was 'safety_review', not 'feedback'. except (json.JSONDecodeError, TypeError): # If parsing fails, we log an error but don't crash the graph. console.print(f"[bold red]Error parsing JSON from {agent_name}: {result.content}[/bold red]") # We update the 'messages' list and crucially, set the 'sender' field for ReAct routing. return {"messages": [result], "sender": agent_name} return agent_nodecreate_agent_node函数是我们系统中每个智能体的标准化包装器。
turn_count),最重要的是更新状态中的sender字段。AgentState中相应的字段(peer_review和safety_review)。现在,让我们为我们的 ReAct 循环定义条件逻辑。这个函数将检查状态中的最后一条消息。如果它包含工具调用,它将把图导向ToolNode。否则,它表示该智能体此步骤的推理已完成。
def tools_condition(state: AgentState) -> str: """A conditional edge that checks for tool calls and the turn count.""" # Examine the most recent message in the state. last_message = state['messages'][-1] # If the message has no tool calls, the agent's turn is done. ifnothasattr(last_message, 'tool_calls') ornot last_message.tool_calls: return"end" # If we've exceeded our maximum number of turns, we also end to prevent loops. if state['turn_count'] >= MAX_TURNS: console.print("[bold yellow]Max turns reached. Ending graph.[/bold yellow]") return"end" # Otherwise, there are tools to be executed. return "tools"tools_condition函数是我们 ReAct 循环的决策者。它在每个智能体回合后充当看门人。它的逻辑简单而强大:
tool_calls。如果找到,它返回字符串"tools",向LangGraph发出信号,将状态路由到我们的工具执行节点。MAX_TURNS限制,它返回"end",允许工作流继续进行。接下来,我们需要一个在工具执行之后指导工作流程的路由器。这就是我们的sender字段变得至关重要的地方。
# This router function will route the workflow back to the agent that originally called the tool.def route_after_tools(state: AgentState) -> str: """A router that sends the workflow back to the agent that initiated the tool call.""" # Get the name of the last agent that acted from the 'sender' field in the state. sender = state.get("sender") console.print(f"--- Routing back to: {sender} after tool execution ---") if not sender: # If for some reason the sender is not set, we end the graph as a fallback. return END # The returned string must match the name of a node in our graph. return sender这个route_after_tools函数是我们 ReAct 实现的后半部分。它是一个条件边,简单地从AgentState中读取由我们的create_agent_node函数留下的sender值并返回它。LangGraph随后将使用这个字符串来路由状态,现在状态中包含了工具的输出,直接返回给请求它的智能体。这使得智能体能够看到其行动的结果并继续其推理过程。
现在是我们最重要的路由逻辑部分,即评审阶段之后的多层次修订循环。
def route_after_review(state: AgentState) -> Literal["PrincipalInvestigator", "HypothesisRefiner", "ProtocolDesigner"]: """ An intelligent router that determines the next step based on the severity of review feedback. """ peer_review = state.get("peer_review", {}) safety_review = state.get("safety_review", {}) # Extract the decision and severity from both reviews, with safe defaults. peer_severity = peer_review.get("critique_severity", "MINOR") safety_severity = safety_review.get("critique_severity", "MINOR") # If our safety counter is maxed out, we must proceed to the PI, regardless of feedback. if state['turn_count'] >= MAX_TURNS: console.print("[bold yellow]Max turns reached during review. Proceeding to PI.[/bold yellow]") return"PrincipalInvestigator" # If EITHER review has a 'CRITICAL' severity, the fundamental hypothesis is flawed. # We route all the way back to the HypothesisRefiner for a major rethink. if peer_severity == 'CRITICAL'or safety_severity == 'CRITICAL': console.print("--- Review requires CRITICAL revision, routing back to HypothesisRefiner. ---") state['messages'].append(HumanMessage(content="Critical feedback received. The core hypothesis needs rethinking.")) return"HypothesisRefiner" # If EITHER review has a 'MAJOR' severity (but no critical ones), the protocol itself is flawed. # We route back to the ProtocolDesigner for a significant revision. if peer_severity == 'MAJOR'or safety_severity == 'MAJOR': console.print("--- Review requires MAJOR revision, routing back to ProtocolDesigner. ---") state['messages'].append(HumanMessage(content="Major feedback received. The protocol needs significant revision.")) return"ProtocolDesigner" # If there are only MINOR revisions or everything is approved, the protocol is fundamentally sound. # We can proceed to the PrincipalInvestigator for the final decision. console.print("--- Reviews complete, routing to PrincipalInvestigator. ---") return "PrincipalInvestigator"这个函数是我们迭代优化过程中最重要的组件。
AgentState中来自peer_review和safety_review的critique_severity。这使它能够做出一个细致的、分层的路由决策:**关键(Critical)**反馈会触发一个循环,一直回到高级研究阶段的开始(HypothesisRefiner)。ProtocolDesigner,而次要(Minor)**或已批准的评审则允许流程向前推进。这种多层次的反馈循环是一个强大的模式,模仿了现实世界中项目是如何被修订的。最后,我们可以将所有这些部分整合到一个构建器函数中,该函数构造并编译我们完整的StateGraph。
def build_graph() -> StateGraph: workflow = StateGraph(AgentState) # Instantiate all our agent runners using the factory function. agent_runners = { "Geneticist": create_agent_runner(junior_researcher_llm, prompts["Geneticist"], all_tools), "Pharmacologist": create_agent_runner(junior_researcher_llm, prompts["Pharmacologist"], all_tools), "Neurologist": create_agent_runner(junior_researcher_llm, prompts["Neurologist"], all_tools), "Supervisor": create_agent_runner(supervisor_llm, prompts["Supervisor"], []), "HypothesisRefiner": create_agent_runner(senior_researcher_llm, prompts["HypothesisRefiner"], all_tools), "ProtocolDesigner": create_agent_runner(senior_researcher_llm, prompts["ProtocolDesigner"], all_tools), "PeerReviewer": create_agent_runner(review_board_llm, prompts["PeerReviewer"], []), "SafetyOfficer": create_agent_runner(review_board_llm, prompts["SafetyOfficer"], []), "PrincipalInvestigator": create_agent_runner(review_board_llm, prompts["PrincipalInvestigator"], []) } # Add all the agent nodes and the single tool execution node to the graph. for name, runner in agent_runners.items(): workflow.add_node(name, create_agent_node(name, runner)) workflow.add_node("execute_tools", ToolNode(all_tools)) # ---- Define the graph's control flow using edges ---- # The graph starts by running the three Junior Researchers in parallel. workflow.add_edge(START, "Geneticist") workflow.add_edge(START, "Pharmacologist") workflow.add_edge(START, "Neurologist") # For each agent that can use tools, we add the ReAct conditional edge. for agent_name in ["Geneticist", "Pharmacologist", "Neurologist", "HypothesisRefiner", "ProtocolDesigner"]: # After the agent runs, check for tool calls. workflow.add_conditional_edges( agent_name, tools_condition, { "tools": "execute_tools", # If tools are called, go to the tool node. "end": "Supervisor"if agent_name in ["Geneticist", "Pharmacologist", "Neurologist"] else"ProtocolDesigner"if agent_name == "HypothesisRefiner"else"PeerReviewer"# If no tools, proceed to the next logical step. } ) # After tools are executed, route back to the agent that called them. workflow.add_conditional_edges("execute_tools", route_after_tools) # Define the main linear flow of the research pipeline. workflow.add_edge("Supervisor", "HypothesisRefiner") workflow.add_edge("PeerReviewer", "SafetyOfficer") # After the SafetyOfficer, use our intelligent review router. workflow.add_conditional_edges("SafetyOfficer", route_after_review) # The PrincipalInvestigator is the final step before the graph ends. workflow.add_edge("PrincipalInvestigator", END) return workflow# Build the graph and compile it into a runnable object.research_graph_builder = build_graph()research_graph = research_graph_builder.compile()print("LangGraph StateGraph builder is defined and compiled.")# We can also visualize our compiled graph to see the final architecture.try: from IPython.display import Image, display png_image = research_graph.get_graph().draw_png() display(Image(png_image))except Exception as e: print(f"Could not visualize graph: {e}. Please ensure pygraphviz and graphviz are installed.") ```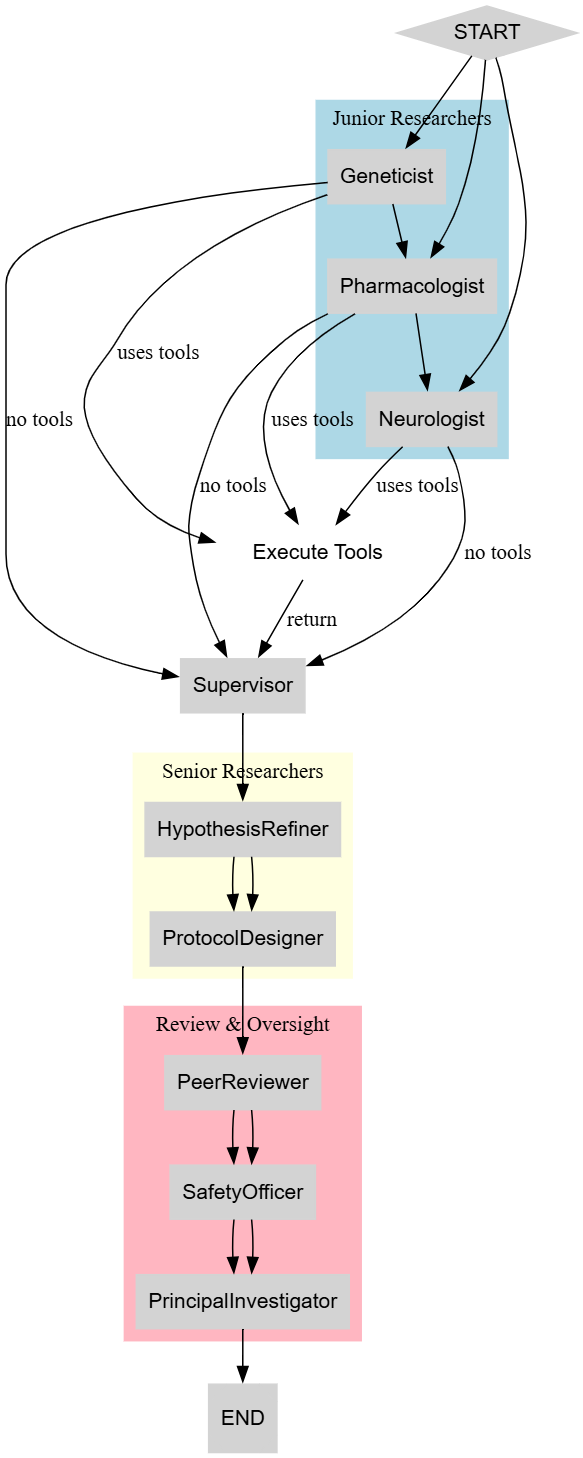 多智能体图结构(由 Fareed Khan 创建) `build_graph` 函数将我们所有的组件——节点、边和路由器——组装成一个完整的、可运行的 `StateGraph`。 我们可以清晰地看到从初级研究员并行的开始,到智能体可以调用工具并获得结果的 ReAct 循环,以及在评审阶段复杂的多层次反馈循环。 我们现在可以开始构建我们智能体系统的训练架构了。让我们开始吧。 ### 具有复杂奖励系统的 LitAgent 我们已经成功地设计并把我们的智能体社群组装成一个复杂的 `LangGraph` 工作流。然而,一个静态的工作流,无论多么复杂,都无法学习或改进。为了实现学习,我们需要在 `LangGraph` 编排和训练框架之间架起一座桥梁。这就是 `Agent-Lightning` 的作用。 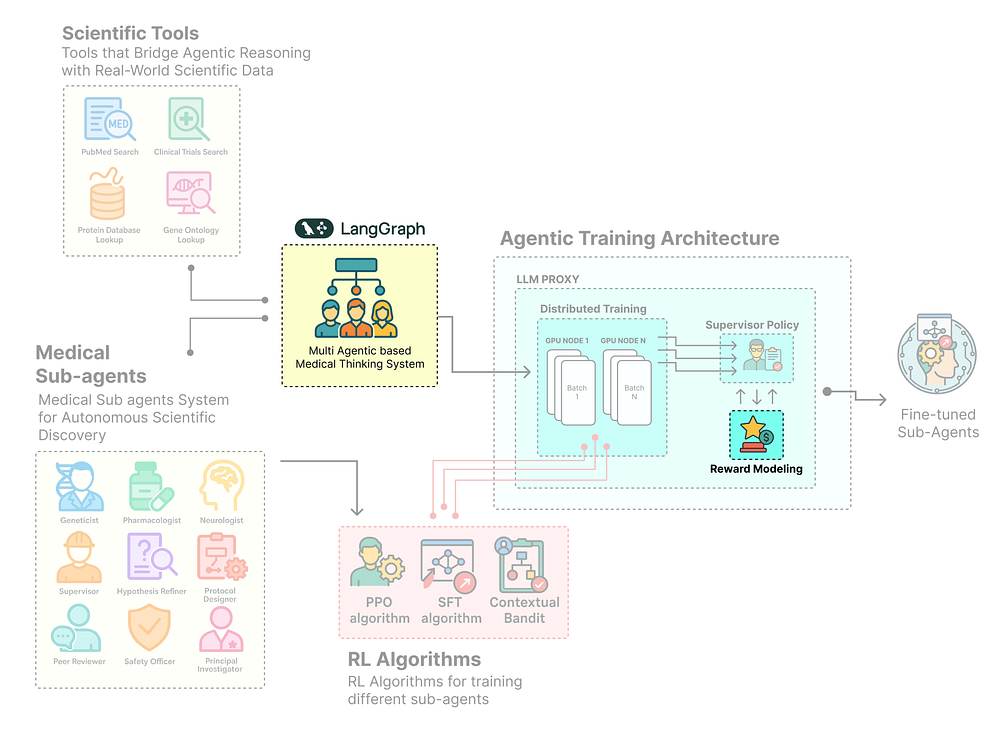 奖励 + 智能体系统(由 Fareed Khan 创建) 在本节中,我们将创建构成这座桥梁的两个关键组件:`LitAgent` 和奖励函数。它们将把我们的静态图转变为一个动态的、可训练的系统。 以下是我们将要做的: * • **封装工作流:** 我们将创建一个 `MedicalResearchAgent` 类,它继承自 `agl.LitAgent`,将我们整个 `LangGraph` 包装在其 `rollout` 方法内部。 * • **实现定向训练:** 我们将设计 `rollout` 方法,以动态地将待训练模型仅注入到我们想要改进的特定节点中(即高级研究员),这是一种用于精确策略更新的强大模式。 * • **设计一个细致的奖励系统:** 我们将构建一个多方面的 `protocol_evaluator` 函数,它充当“作为评判者的 LLM”(LLM-as-a-Judge),根据可行性、影响力和依据性等多个标准对智能体的最终输出进行评分。 * • **创建加权奖励:** 我们将实现一个函数,将这些多个分数合并成一个单一的加权奖励信号,该信号将指导我们的强化学习算法。 ### 创建 MedicalResearchAgent 使我们的系统可训练的第一步是将我们的 `LangGraph` 工作流封装在 `agl.LitAgent` 中。`LitAgent` 是 Agent-Lightning 生态系统中最基本、可训练的单元。其主要工作是定义一个 `rollout` 方法,这是我们的智能体在给定任务上的一次完整的、端到端的执行。  MedicalResearchAgent 流程(由 Fareed Khan 创建) 我们将创建一个名为 `MedicalResearchAgent` 的类,它继承自 `agl.LitAgent`。这个类将持有我们已编译的 `LangGraph` 和我们的奖励函数。它的 `rollout` 方法将是训练循环的核心:它将从我们的数据集中获取一个研究目标,执行完整的图,然后使用奖励函数对最终结果进行评分。 > 这里的关键工程设计在于我们如何处理待训练的模型。 `rollout` 方法不会让图使用固定的模型集,而是会动态地将由 `Agent-Lightning` 训练器提供的 LLM 端点绑定到我们想要训练的特定智能体节点上(即我们的高级研究员)。这允许在更大的多智能体系统中对特定智能体的策略进行定向的、精确的微调。 让我们开始定义我们的 `MedicalResearchAgent` 类。 ```plaintext import agentlightning as aglfrom typing importAny, castclassMedicalResearchAgent(agl.LitAgent): def__init__(self, graph, reward_func): # The LitAgent must be initialized with the compiled graph and the reward function. super().__init__() self.graph = graph self.reward_func = reward_func defrollout(self, task: ResearchTask, resources: agl.NamedResources, rollout: agl.Rollout) -> None: # This method defines a single, end-to-end run of our agent. console.print(f"\n[bold green]-- Starting Rollout {rollout.rollout_id} for Task: {task['id']} --[/bold green]") # The 'senior_researcher_llm' resource is our model-under-training, served by the VERL algorithm via the LLMProxy. llm_resource = cast(agl.LLM, resources['senior_researcher_llm']) # The trainer's tracer provides a LangChain callback handler, which is crucial for deep observability in LangSmith. langchain_callback_handler = self.trainer.tracer.get_langchain_handler() # Here we dynamically bind the LLM endpoint from the training resources to the specific # agent runners we want to train. This is the key to targeted policy optimization. llm_with_endpoint = senior_researcher_llm.with_config({ "openai_api_base": llm_resource.endpoint, "openai_api_key": llm_resource.api_key or"dummy-key" }) # We create fresh agent runners for this specific rollout, using the updated LLM binding. hypothesis_refiner_agent_trained = create_agent_runner(llm_with_endpoint, prompts["HypothesisRefiner"], all_tools) protocol_designer_agent_trained = create_agent_runner(llm_with_endpoint, prompts["ProtocolDesigner"], all_tools) # We get a mutable copy of the graph to temporarily update the nodes for this rollout. graph_with_trained_model = self.graph.copy() # We replace the functions for the 'HypothesisRefiner' and 'ProtocolDesigner' nodes with our newly created, trainable runners. graph_with_trained_model.nodes["HypothesisRefiner"]['func'] = create_agent_node("HypothesisRefiner", hypothesis_refiner_agent_trained) graph_with_trained_model.nodes["ProtocolDesigner"]['func'] = create_agent_node("ProtocolDesigner", protocol_designer_agent_trained) # Compile the modified graph into a runnable for this specific rollout. runnable_graph = graph_with_trained_model.compile() # Prepare the initial state for the graph execution. initial_state = {"research_goal": task['goal'], "messages": [HumanMessage(content=task['goal'])], "turn_count": 0, "initial_hypotheses": []} # Configure the run to use our LangSmith callback handler. config = {"callbacks": [langchain_callback_handler]} if langchain_callback_handler else {} try: # Execute the full LangGraph workflow from start to finish. final_state = runnable_graph.invoke(initial_state, config=config) # Extract the final protocol from the graph's terminal state. final_protocol = final_state.get('final_protocol') # If a protocol was successfully generated, we calculate its reward. if final_protocol: console.print("--- Final Protocol Generated by Agent ---") console.print(final_protocol) # Call our multi-faceted reward function to get a dictionary of scores. reward_scores = self.reward_func(final_protocol, task['context']) # Convert the scores into a single weighted reward value. final_reward = get_weighted_reward(reward_scores) else: # Assign a reward of 0.0 for failed or incomplete rollouts. final_reward = 0.0 # Emit the final reward. Agent-Lightning captures this value and uses it for the RL update step. agl.emit_reward(final_reward) console.print(f"[bold green]-- Rollout {rollout.rollout_id} Finished with Final Reward: {final_reward:.2f} --[/bold green]") # The method returns None because the results (reward and traces) are emitted via agl.emit_* calls. return NoneMedicalResearchAgent类现在是我们的核心可训练单元。它将LangGraph的复杂多步逻辑与Agent-Lightning训练循环连接起来。
senior_researcher_llm的动态绑定。请注意,我们没有修改原始图。rollout,我们都会创建一个临时的、修改过的图的副本,其中只有高级研究员节点指向待训练的模型。通过这种方法,我们的 PPO 算法更新将只影响高级研究员的策略,教他们如何更好地完善假设和设计方案,而其他智能体(初级研究员、评审委员会等)则继续使用它们稳定的、预定义的模型。这使得在一个复杂且异构的多智能体系统中进行定向、高效的训练成为可能。
一直在更新,更多的大模型学习和面试资料已经上传带到CSDN的官方了,有需要的朋友可以扫描下方二维码免费领取【保证100%免费】👇👇
一个强化学习智能体的好坏取决于它所学习的奖励信号。对于像科学研究这样细致入微的任务,一个简单的二元奖励(例如,成功=1,失败=0)是不足够的。
它无法教会智能体区分一个平庸的方案和一个出色的方案。
奖励系统如何工作(由 Fareed Khan 创建)
为了提供一个丰富、信息量大的学习信号,我们将设计一个奖励系统。我们将构建一个protocol_evaluator函数,它充当**“作为评判者的 LLM”**(LLM-as-a-Judge)。
这个**“评判者”**将是一个强大的模型,它会从多个不同的角度评估智能体最终生成的方案,并提供一个结构化的分数词典。
以下是我们将要做的:
EvaluationOutput,它定义了我们的评判者将使用的具体标准,包括新颖性、可行性、影响力、清晰度,以及至关重要的、相对于源上下文的依据性(groundedness)。protocol_evaluator函数,该函数为我们的评判者 LLM 格式化一个详细的提示,并解析其结构化的响应。get_weighted_reward函数,该函数接收来自我们评估器的分数词典,并将它们组合成一个单一的浮点奖励值,使我们能够优先考虑某些标准(如影响力)而非其他。首先,让我们为我们的评估定义 Pydantic 模式。这个模式充当我们 LLM 评判者的严格“评分标准”,确保其反馈是一致且机器可读的。
from langchain_core.pydantic_v1 import BaseModel, Field# This Pydantic model defines the "scorecard" for our LLM-as-a-Judge.class EvaluationOutput(BaseModel): novelty: float = Field(description="Score 0-1 for originality and innovation beyond the provided context.") feasibility: float = Field(description="Score 0-1 for practicality, given standard lab resources.") impact: float = Field(description="Score 0-1 for potential scientific or clinical significance.") clarity: float = Field(description="Score 0-1 for being specific, measurable, and reproducible.") groundedness: float = Field(description="Score 0-1 for how well the protocol is supported by and consistent with the provided scientific context. Penalize any claims not supported by the context.") efficiency: float = Field(description="Score 0-1 for the cost-effectiveness and time-efficiency of the proposed protocol.")我们现在已经创建了EvaluationOutput模式,这是我们奖励系统的正式评分标准。通过定义这些具体的、描述清晰的字段,我们为评估器 LLM 提供了明确的指令。
依据性(groundedness)的加入尤为重要,因为它将教会我们的 PPO 智能体避免产生幻觉或提出未经其所审阅文献支持的主张。新的效率(efficiency)指标进一步丰富了学习信号,推动智能体考虑实际限制。
现在,让我们构建将使用此模式的主protocol_evaluator函数。
def protocol_evaluator(protocol: Protocol, context: str) -> dict: """ Acts as an LLM-as-a-Judge to score a protocol against multiple criteria. """ console.print("--- Running Protocol Evaluator (Reward Function) ---") # The prompt for our LLM judge is detailed, asking it to act as an expert panel. evaluator_prompt = ChatPromptTemplate.from_messages([ ("system", "You are an expert panel of senior scientists. Evaluate the following experimental protocol on a scale of 0.0 to 1.0 for each of the specified criteria. Be critical and justify your scores briefly."), # We provide both the original scientific context and the agent's generated protocol. ("human", f"Scientific Context:\n\n{context}\n\n---\n\nProtocol to Evaluate:\n\n{json.dumps(protocol, indent=2)}") ]) # We use our powerful review_board_llm and instruct it to format its output according to our EvaluationOutput schema. evaluator_llm = review_board_llm.with_structured_output(EvaluationOutput) try: # Invoke the evaluator chain. evaluation = evaluator_llm.invoke(evaluator_prompt.format_messages()) # The output is a Pydantic object, which we can easily convert to a dictionary. scores = evaluation.dict() console.print(f"Generated Scores: {scores}") return scores except Exception as e: # If the LLM fails to generate a valid evaluation, we return a default low score to penalize the failure. console.print(f"[bold red]Error in protocol evaluation: {e}. Returning zero scores.[/bold red]") return {"novelty": 0.1, "feasibility": 0.1, "impact": 0.1, "clarity": 0.1, "groundedness": 0.1, "efficiency": 0.1}protocol_evaluator函数是我们的自动化质量保证步骤。
protocol和数据集中的原始context。review_board_llm,指示它充当专家小组并返回一个结构化的EvaluationOutput。try...except块是生产级工程的一个关键部分,它确保即使评估 LLM 失败或产生格式错误的输出,我们的训练循环也不会崩溃。相反,智能体会收到一个低奖励,从而正确地惩罚失败的 rollout。最后,我们的强化学习算法需要一个单一的浮点数来进行更新。以下函数接收分数词典并将其压缩成一个单一的加权平均值。
def get_weighted_reward(scores: dict) -> float: """ Calculates a single weighted reward score from a dictionary of metric scores. """ # These weights allow us to prioritize certain aspects of a "good" protocol. # Here, we're saying 'impact' is the most important factor, and 'efficiency' is a nice-to-have. weights = { "novelty": 0.1, "feasibility": 0.2, "impact": 0.3, "clarity": 0.15, "groundedness": 0.2, "efficiency": 0.05 } # Calculate the weighted sum of scores. If a score is missing from the input dictionary, it defaults to 0. weighted_sum = sum(scores.get(key, 0) * weight for key, weight in weights.items()) return weighted_sum我们现在可以测试这个奖励系统,观察它是如何工作的……
print("Multi-faceted and weighted reward function defined.")# Let's test the full reward pipeline with a sample protocol.test_protocol = {"title": "Test Protocol", "steps": ["1. Do this.", "2. Do that."], "safety_concerns": "Handle with care.", "budget_usd": 50000.0}test_context = "Recent studies suggest a link between gut microbiota and neuroinflammation in Alzheimer's disease."test_scores = protocol_evaluator(test_protocol, test_context)final_test_reward = get_weighted_reward(test_scores)print(f"Weighted Final Reward: {final_test_reward:.2f}")#### OUTPUT ####Multi-faceted and weighted reward function defined.--- Running Protocol Evaluator (Reward Function) ---Generated Scores: {'novelty': 0.8, 'feasibility': 0.7, 'impact': 0.9, 'clarity': 0.85, 'groundedness': 0.95, 'efficiency': 0.9}Weighted Final Reward: 0.84get_weighted_reward函数是我们奖励计算的最后一步。通过为每个标准分配不同的权重,我们可以微调学习信号以匹配我们特定的研究目标。
impact最高权重(0.3),我们明确地告诉我们的强化学习算法优先考虑那些具有重大科学突破潜力的方案。我们现在有了一个奖励信号来指导我们的智能体训练。
我们现在已经用LangGraph设计了我们的智能体社群,并构建了一个奖励系统。下一个合乎逻辑的步骤是建立工业级的基础设施,使我们能够高效、大规模地训练这些智能体。这就是Agent-Lightning先进功能发挥作用的地方。
智能体训练架构(由 Fareed Khan 创建)
一个简单的单进程训练循环对于一个进行大量 LLM 调用的复杂多智能体系统来说是不够的。
我们需要一个分布式架构,可以并行运行多个智能体“rollouts”,同时管理一个中央训练算法。
在本节中,我们将配置Agent-Lightning训练基础设施的核心组件:
ClientServerExecutionStrategy,以在多个并行进程中运行我们的智能体 rollouts,从而显著加快数据收集速度。LLMProxy作为一个中央枢纽,智能地将对不同模型的请求路由到不同的后端,包括我们正在训练的模型。HierarchicalTraceAdapter,它可以处理一个复杂的智能体追踪,并为我们不同的训练算法(SFT、PPO 和上下文老虎机)生成格式各异的数据集。WandbLoggingHook,将我们智能体的性能实时记录到 Weights & Biases,为我们提供学习过程的实时视图。为了进行我们的训练,我们需要尽快地从我们的智能体那里收集经验。一次只运行一个 rollout 会是一个主要的瓶颈。因此,我们将配置我们的Trainer使用ClientServerExecutionStrategy。
这个策略创建了一个分布式训练架构。主进程将运行核心训练算法(如 PPO)和一个LightningStoreServer来管理数据。
分布式系统(由 Fareed Khan 创建)
然后它将生成多个独立的runner进程。每个 runner 将充当客户端,连接到服务器获取任务,然后并行执行我们MedicalResearchAgent的rollout方法。这使我们能够同时收集大量训练数据,这对于高效的强化学习至关重要。
我们将定义一个简单的配置字典来指定这个策略以及我们想要使用的并行 runner 的数量。
import agentlightning as agl# We'll configure our system to run 4 agent rollouts in parallel.num_runners = 4 # This dictionary defines the execution strategy for the Agent-Lightning Trainer.strategy_config = { "type": "cs", # 'cs' is the shorthand for ClientServerExecutionStrategy. "n_runners": num_runners, # The number of parallel worker processes to spawn. "server_port": 48000 # We specify a high port to avoid potential conflicts with other services.}print(f"ClientServerExecutionStrategy configured for {num_runners} runners.")我们现在已经定义了我们分布式训练基础设施的蓝图。strategy_config字典是一个简单但功能强大的声明。
当我们把它传递给我们的agl.Trainer时,它会自动处理设置多进程架构的所有复杂性,包括进程间通信和数据同步。这使我们能够通过简单地增加n_runners来扩展我们的数据收集工作,而无需改变我们的核心智能体或算法代码。
我们的智能体社群是异构的,它为不同的角色使用不同的模型。管理这些多个模型端点可能很复杂,特别是当其中一个是正在动态提供服务的待训练模型时。
Agent-Lightning的LLMProxy是解决这个问题的完美方案。
LLM 代理(由 Fareed Khan 创建)
它充当所有 LLM 调用的单一网关。我们的LitAgent会将其所有请求发送到代理的地址。然后,代理根据调用中指定的model_name智能地将每个请求路由到正确的后端模型。
这对于我们的训练设置尤其强大:
VERL(PPO) 算法将能够自动更新代理的配置,将对"senior_researcher_llm"的调用重定向到其自己动态提供的 vLLM 实例。Qwen2或Mixtral)的请求将被路由到不同的后端,例如本地的 Ollama 服务器。让我们来定义LLMProxy的配置。
# The 'model_list' defines the routing rules for the LLMProxy.llm_proxy_config = { "port": 48001, # The port the LLMProxy itself will listen on. "model_list": [ # Rule 1: For Junior Researchers and the Supervisor. # Any request for this model name will be forwarded to a local Ollama server running Qwen2. { "model_name": "Qwen/Qwen2-1.5B-Instruct", "litellm_params": {"model": "ollama/qwen2:1.5b"} }, # Rule 2: For our Senior Researcher (the model-under-training). # Initially, it might point to a baseline model. During training, the VERL algorithm # will automatically update this entry to point to its own vLLM server. { "model_name": "senior_researcher_llm", "litellm_params": {"model": "ollama/llama3"} # An initial fallback. }, # Rule 3: For the powerful Review Board. # Requests for this model will be routed to a local Ollama server running Mixtral. { "model_name": "mistralai/Mixtral-8x7B-Instruct-v0.1", "litellm_params": {"model": "ollama/mixtral"} } ]}llm_proxy_config字典是我们整个多智能体系统的路由表。
"senior_researcher_llm")与物理模型后端(例如,一个特定的 Ollama 端点或一个动态的 vLLM 服务器)解耦。LLMProxy为我们系统中所有的模型交互提供了一个单一的控制和可观测性点。我们的分层训练策略带来了一个独特的数据处理挑战。对于每次 rollout,我们只有一个复杂的LangGraph追踪,但我们需要为三种不同的训练算法提供数据,每种算法期望的格式都不同:
强化学习算法实现(由 Fareed Khan 创建)
state,action,reward)。context,action,reward) 元组。为了解决这个问题,我们将构建一个自定义的、复杂的追踪适配器 (Trace Adapter)。在Agent-Lightning中,适配器是一个类,它将原始的追踪数据(来自LangSmith的 span 列表)转换为训练算法所需的特定格式。
我们的
HierarchicalTraceAdapter将是一个多头数据处理器,能够从单个源追踪中生成所有三种所需的数据格式。
我们将创建一个继承自agl.TracerTraceToTriplet的新类,并为其添加新方法,每个方法对应我们目标数据格式中的一种。这展示了Agent-Lightning数据流水线的强大灵活性。
让我们来定义HierarchicalTraceAdapter类。
from agentlightning.adapter import TraceToMessagesclassHierarchicalTraceAdapter(agl.TracerTraceToTriplet): def__init__(self, *args, **kwargs): # We initialize the parent class for PPO triplet generation. super().__init__(*args, **kwargs) # We also create an instance of a standard adapter for SFT message generation. self.message_adapter = TraceToMessages() defadapt_for_sft(self, source: List[agl.Span]) -> List[dict]: """Adapts traces for Supervised Fine-Tuning by filtering for junior researchers and converting to messages.""" # Define the names of the nodes corresponding to our Junior Researcher agents. junior_agent_names = ["Geneticist", "Pharmacologist", "Neurologist"] # Filter the raw trace to get only the spans generated by these agents. # LangSmith conveniently adds a 'name' field for LangGraph nodes in the span attributes. junior_spans = [s for s in source if s.attributes.get('name') in junior_agent_names] console.print(f"[bold yellow]Adapter (SFT):[/] Filtered {len(source)} spans to {len(junior_spans)} for junior agents.") ifnot junior_spans: return [] # Use the standard message adapter to convert these filtered spans into a conversational dataset. returnself.message_adapter.adapt(junior_spans) defadapt_for_ppo(self, source: List[agl.Span]) -> List[agl.Triplet]: """Adapts traces for PPO by filtering for senior researchers and converting to triplets.""" # Define the names of the nodes for our Senior Researcher agents. senior_agent_names = ["HypothesisRefiner", "ProtocolDesigner"] # We configure the parent class's filter to only match these agent names. self.agent_match = '|'.join(senior_agent_names) # Now, when we call the parent's 'adapt' method, it will automatically filter and process only the relevant spans. ppo_triplets = super().adapt(source) console.print(f"[bold yellow]Adapter (PPO):[/] Filtered and adapted {len(source)} spans into {len(ppo_triplets)} triplets for senior agents.") return ppo_triplets defadapt_for_bandit(self, source: List[agl.Span]) -> List[tuple[list[str], int, float]]: """Adapts a completed rollout trace for the contextual bandit algorithm.""" # First, find the final reward for the entire rollout. final_reward = agl.find_final_reward(source) if final_reward isNone: return [] # Next, find the specific span where the Supervisor agent made its decision. supervisor_span = next((s for s in source if s.attributes.get('name') == 'Supervisor'), None) ifnot supervisor_span: return [] # Then, we need to reconstruct the 'context' - the list of hypotheses the supervisor had to choose from. junior_spans = [s for s in source if s.attributes.get('name') in ["Geneticist", "Pharmacologist", "Neurologist"]] contexts = [] # We sort by start time to ensure the order of hypotheses is correct. for span insorted(junior_spans, key=lambda s: s.start_time): try: # In LangGraph, the agent's final JSON output is in the 'messages' attribute of the state. output_message = span.attributes.get('output.messages') if output_message andisinstance(output_message, list): # The actual content is a JSON string within the AIMessage's content field. content_str = output_message[-1].get('content', '{}') hypothesis_data = json.loads(content_str) contexts.append(hypothesis_data.get('hypothesis', '')) except (json.JSONDecodeError, KeyError, IndexError): continue ifnot contexts: return [] # Finally, extract the 'action' - the index of the hypothesis the supervisor chose. try: output_message = supervisor_span.attributes.get('output.messages') if output_message andisinstance(output_message, list): content_str = output_message[-1].get('content', '{}') supervisor_output = json.loads(content_str) chosen_index = supervisor_output.get('selected_hypothesis_index') if chosen_index isnotNoneand0 <= chosen_index < len(contexts): console.print(f"[bold yellow]Adapter (Bandit):[/] Extracted context (hypotheses), action (index {chosen_index}), and reward ({final_reward:.2f}).") # Return the single data point for the bandit algorithm. return [(contexts, chosen_index, final_reward)] except (json.JSONDecodeError, KeyError, IndexError): pass return []# Instantiate our custom adapter.custom_adapter = HierarchicalTraceAdapter()HierarchicalTraceAdapter体现了Agent-Lightning数据流水线的灵活性。我们创建了一个单一而强大的数据处理类,满足了我们整个分层训练策略的需求。
adapt_for_sft方法充当过滤器,精确地只提取涉及我们初级研究员的对话回合,并将它们完美地格式化以供微调。adapt_for_ppo方法利用了父类TracerTraceToTriplet的强大功能,但巧妙地动态配置它,使其只处理来自我们高级研究员的 spans。adapt_for_bandit方法最为复杂,它对整个追踪进行法医级分析,通过找到可用的选择(contexts)、选择的action和最终的reward,重构了主管的决策时刻。这个适配器是我们训练架构的关键。它允许我们维护一个单一、统一的智能体工作流 (LangGraph) 和一个单一的数据源 (LangSmith追踪),同时仍然能够对该工作流的不同组件应用专门的、定向的训练算法。
有效的训练不仅仅是运行一个算法;它需要实时的可观测性。
我们需要能够**“看到”**我们智能体在学习过程中的表现,一次又一次的 rollout。
虽然LangSmith为我们提供了对单个追踪的深入、法医级的细节,但我们还需要一个对训练进度的高层、聚合视图。
监控钩子(由 Fareed Khan 创建)
为了实现这一点,我们将创建一个自定义的Hook。在Agent-Lightning中,Hook是一个强大的机制,它允许你在训练生命周期的不同点(例如on_rollout_start、on_trace_end)注入自定义逻辑。
我们将构建一个WandbLoggingHook,它监听on_trace_end事件。一旦一个 rollout 完成并且其追踪可用,这个钩子就会触发。
它将从追踪中提取最终奖励,并将这个单一的关键指标记录到 Weights & Biases (W&B) 项目中。这将为我们提供一个我们智能体奖励的实时流式图表,为其学习曲线提供即时且直观的可视化。
让我们来定义我们的自定义钩子类。
import wandbclassWandbLoggingHook(agl.Hook): def__init__(self, project_name: str): # We initialize the W&B run once, when the hook is created. self.run_initialized = False if os.environ.get("WANDB_API_KEY"): try: wandb.init(project=project_name, resume="allow", id=wandb.util.generate_id()) self.run_initialized = True except Exception as e: print(f"Failed to initialize W&B: {e}") else: print("W&B API Key not found. Hook will be inactive.") asyncdefon_trace_end(self, *, rollout: agl.Rollout, tracer: agl.Tracer, **kwargs): """ This method is automatically called by the Trainer at the end of every rollout. """ # If W&B wasn't initialized, we do nothing. ifnotself.run_initialized: return # Use a helper function to find the final reward value from the list of spans in the trace. final_reward_value = agl.find_final_reward(tracer.get_last_trace()) # If a reward was found, log it to W&B. if final_reward_value isnotNone: # We log the reward itself, and the rollout_id for cross-referencing. wandb.log({"live_reward": final_reward_value, "rollout_id": rollout.rollout_id}) console.print(f"[bold blue]Hook:[/] Logged reward {final_reward_value:.2f} for rollout {rollout.rollout_id} to W&B.")# Instantiate our custom hook.custom_hook = WandbLoggingHook(project_name="Chimera-Project-Training")WandbLoggingHook是我们训练过程的实时仪表板。通过实现on_trace_end方法,我们创建了一个轻量级的、事件驱动的监视器,它无缝地集成到Agent-Lightning的生命周期中。
所以它的工作原理是这样的……
agl.find_final_reward辅助函数是一个方便的工具,它知道如何解析追踪以找到我们LitAgent发出的奖励值。custom_hook传递给我们的agl.Trainer时,这种日志记录将在后台为我们并行运行器执行的每一个 rollout 自动进行。我们现在已经组装了所有必要的基础设施:一个分布式执行策略、一个多模型代理、一个复杂的数据适配器和一个实时监控钩子。现在是时候定义训练算法本身了。
这是我们分层训练策略的核心。
我们不会使用单一的、庞大的算法。相反,我们将定义三种不同的训练算法……
每种算法都针对我们智能体社群的特定层次量身定制。这种方法允许我们为正确的认知任务应用正确的学习范式,这是构建真正有效和精细的智能体系统的关键一步。
在本节中,我们将为我们层次结构的每个级别实现完整的训练逻辑:
LightningStore中的成功追踪来教他们如何生成更好的初始假设。VERL算法,对我们的高级研究员执行在线强化学习,使用我们评估器提供的丰富、多方面的奖励信号来提高他们的方案设计技能。fit()循环中编排这三种算法,展示如何执行一个复杂的多阶段训练流水线。一直在更新,更多的大模型学习和面试资料已经上传带到CSDN的官方了,有需要的朋友可以扫描下方二维码免费领取【保证100%免费】👇👇
我们的第一个训练目标是初级研究员团队。他们的任务是进行创造性头脑风暴——生成新颖且可信的假设。这非常适合使用监督微调(Supervised Fine-Tuning, SFT)。
这个想法简单而强大:我们将找到那些最终奖励很高的 rollout,从这些追踪中提取初级研究员的成功对话,并将它们用作高质量的数据集来微调基础模型。这教会模型模仿成功构思的模式。
SFT 训练(由 Fareed Khan 创建)
我们将创建一个名为SFTOnSuccess的自定义Algorithm类。这个类将查询LightningStore以获取高奖励的追踪,使用我们的HierarchicalTraceAdapter将它们转换为对话数据集,然后使用高度优化的unsloth库在一个单独的进程中执行微调。
这里的关键工程设计是,训练后,算法将通过vLLM提供新的、微调过的模型,并动态更新LLMProxy,将针对初级智能体的流量路由到这个改进后的模型。这“闭合了循环”,确保后续的 rollouts 将受益于这次训练。
首先,让我们创建一些辅助函数来管理 SFT 训练和模型服务,这些将在一个单独的进程中运行,以避免 GPU 内存冲突。
import asyncioimport multiprocessingimport subprocessimport httpximport timefrom contextlib import contextmanagerfrom datasets import Dataset as HuggingFaceDatasetfrom trl import SFTTrainer, SFTConfigfrom unsloth import FastLanguageModel@contextmanagerdefserve_vllm_model(model_path: str, port: int): """A context manager to start and automatically shut down a vLLM server.""" console.print(f"[SFT - vLLM] Starting vLLM server for model {model_path} on port {port}...") proc = None try: # We use 'agl vllm serve' which is a wrapper ensuring the server is compatible with tool-use tokenization. cmd = ["agl", "vllm", "serve", model_path, "--port", str(port), "--gpu-memory-utilization", "0.7", "--enable-auto-tool-choice"] proc = subprocess.Popen(cmd, stdout=subprocess.DEVNULL, stderr=subprocess.DEVNULL) # Health check loop to wait until the server is responsive. with httpx.Client() as client: for _ inrange(60): # 60-second timeout try: if client.get(f"http://localhost:{port}/health").status_code == 200: console.print(f"[SFT - vLLM] Server on port {port} is ready.") yieldf"http://localhost:{port}/v1"# Yield the endpoint URL. return except httpx.ConnectError: pass time.sleep(1) raise RuntimeError(f"vLLM server on port {port} failed to start.") finally: # This code runs on exit, ensuring the server process is terminated. if proc: proc.terminate() proc.wait() console.print(f"[SFT - vLLM] Server on port {port} shut down.")defunsloth_sft_trainer(dataset, base_model, output_dir): """The actual SFT training function that will run in a separate process.""" console.print(f"[SFT Process] Loading base model: {base_model}") # Load the model with 4-bit quantization and PEFT adapter configuration using unsloth for efficiency. model, tokenizer = FastLanguageModel.from_pretrained(model_name=base_model, max_seq_length=4096, load_in_4bit=True) model = FastLanguageModel.get_peft_model(model, r=16, target_modules=["q_proj", "k_proj", "v_proj", "o_proj"], lora_alpha=16, lora_dropout=0, bias="none") # Configure and run the SFTTrainer from the TRL library. trainer = SFTTrainer( model=model, tokenizer=tokenizer, train_dataset=dataset, dataset_text_field="messages", # We tell the trainer to use the 'messages' column. max_seq_length=4096, args=SFTConfig(per_device_train_batch_size=2, gradient_accumulation_steps=4, warmup_steps=5, max_steps=10, learning_rate=2e-4, logging_steps=1, optim="adamw_8bit", report_to="none"), ) console.print("[SFT Process] Starting SFT training...") trainer.train() console.print("[SFT Process] SFT training finished. Saving merged model.") # Save the final, merged model in 16-bit precision. model.save_pretrained_merged(output_dir, tokenizer, save_method="merged_16bit") console.print(f"[SFT Process] Model saved to {output_dir}") return output_dir我们现在已经定义了我们的核心 SFT 工具。unsloth_sft_trainer函数封装了整个微调过程,使用unsloth以实现最高效率,包括以 4 位精度加载模型和保存最终合并的适配器。
serve_vllm_model上下文管理器是一个关键的基础设施;它以编程方式为我们新训练的模型启动一个vLLM服务器,等待它准备就绪,并保证服务器之后被干净地关闭。这些辅助函数使我们的主算法类保持整洁,并专注于编排工作。
现在,让我们创建SFTOnSuccess算法类本身。
from agentlightning.algorithm import AlgorithmclassSFTOnSuccess(Algorithm): def__init__(self, reward_threshold=0.8, base_model="Qwen/Qwen2-1.5B-Instruct"): super().__init__() self.reward_threshold = reward_threshold # Only learn from rollouts with a reward >= 0.8. self.base_model = base_model self.adapter = HierarchicalTraceAdapter() # Use our custom adapter to get the right data format. asyncdefrun(self, train_dataset, val_dataset): console.print("\n[bold magenta]--- Starting SFT Training for Junior Researchers ---[/bold magenta]") # Get a handle to the central data store. store = self.get_store() console.print("Analyzing existing rollouts for SFT data collection...") # Query the store for all successfully completed rollouts. all_rollouts = await store.query_rollouts(status=["succeeded"]) high_reward_traces = [] # Filter these rollouts to find the ones that meet our reward threshold. for rollout in all_rollouts: spans = await store.query_spans(rollout.rollout_id) final_reward = agl.find_final_reward(spans) if final_reward and final_reward >= self.reward_threshold: high_reward_traces.append(spans) console.print(f"Found {len(high_reward_traces)} high-reward traces (threshold >= {self.reward_threshold}).") if high_reward_traces: # Use our custom adapter to convert the successful traces into SFT-ready conversational data. sft_data = self.adapter.adapt_for_sft(sum(high_reward_traces, [])) sft_dataset = HuggingFaceDataset.from_list([{'messages': m['messages']} for m in sft_data]) console.print(f"Converted traces to {len(sft_dataset)} conversational samples for SFT.") # Define a unique output directory for the new model. output_dir = f"./models/junior_researcher_sft_v{int(time.time())}" # Use a multiprocessing 'spawn' context for GPU safety. ctx = multiprocessing.get_context("spawn") q = ctx.Queue() # Run the training in a separate process. p = ctx.Process(target=lambda: q.put(unsloth_sft_trainer(sft_dataset, self.base_model, output_dir))) p.start() p.join() # Wait for training to complete. final_output_dir = q.get() # Get a handle to the LLMProxy. llm_proxy = self.get_llm_proxy() if llm_proxy: console.print("Updating LLMProxy with new SFT model...") new_port = 8002# In a real system, this should be dynamically allocated. # Use our context manager to serve the new model. with serve_vllm_model(final_output_dir, new_port) as new_endpoint: # Update the proxy's routing table to point to the new model server. await llm_proxy.replace_model(self.base_model, f"openai/{final_output_dir}", api_base=new_endpoint) console.print(f"LLMProxy updated. Junior researchers will now use {new_endpoint}.") console.print("Keeping new model server alive for 60s for subsequent rollouts...") await asyncio.sleep(60) # Keep the server alive temporarily for the demo.# Instantiate our SFT algorithm.sft_algorithm = SFTOnSuccess()SFTOnSuccess类是我们初级研究员的一个完整的、自包含的训练流水线。它展示了一种强大的**“从成功中学习”**的模式。
run方法编排了整个过程:它通过查询和过滤LightningStore中最好的数据来扮演数据科学家的角色,然后通过启动一个独立的、使用unsloth优化的训练过程来扮演机器学习工程师的角色。
最后一步是最关键的,它通过编程方式启动一个带有微调产物的新模型服务器,然后更新中央的
LLMProxy,扮演了 DevOps 工程师的角色。
这种闭合循环的方式使其成为一个真正的在线训练系统。一旦训练完成,整个多智能体社群就能立即从改进后的模型中受益,无需任何手动干预。
接下来,我们向上移动层级,训练我们的高级研究员智能体。他们的任务——设计一个详细的实验方案——不仅仅是创造力的问题;它是一个有条不紊的、序贯的决策过程。这使其成为在线**强化学习(Reinforcement Learning, RL)**的理想候选。
我们希望教会智能体不仅仅是模仿好的例子,而是要主动探索可能方案的空间,并学习一种能够最大化复杂、多方面奖励的策略。
PPO 算法(由 Fareed Khan 创建)
为此,我们将使用VERL(Value-based Experience Replay Learning)算法,这是Agent-Lightning中内置的一个强大的 PPO 实现。**我们不需要自己编写复杂的 PPO 逻辑。相反,我们的工作是正确地配置它。**这包括定义要训练的模型、PPO 算法的超参数以及数据收集参数。
这里的一个关键方面是,在运行此算法时,我们会将我们的自定义HierarchicalTraceAdapter传递给Trainer。这确保了VERL算法只看到由高级研究员智能体(HypothesisRefiner和ProtocolDesigner)生成的(状态, 行动, 奖励)三元组,从而精确地将我们的训练工作集中在我们想要改进的特定策略上。
让我们为VERL算法定义配置字典。
# This is a standard configuration dictionary for the agl.VERL algorithm.verl_config = { # Algorithm-specific hyperparameters. 'grpo' is an advanced advantage estimator. "algorithm": {"adv_estimator": "grpo"}, # Data configuration for training batches and sequence lengths. "data": {"train_batch_size": 4, "max_prompt_length": 4096, "max_response_length": 2048}, # This block defines the models and their training configurations. "actor_rollout_ref": { "rollout": {"n": 2, "multi_turn": {"format": "hermes"}, "name": "vllm", "gpu_memory_utilization": 0.6}, "actor": {"ppo_mini_batch_size": 4, "optim": {"lr": 1e-6}}, # The base model we will be fine-tuning with PPO. "model": {"path": "meta-llama/Llama-3-8B-Instruct", "enable_gradient_checkpointing": True}, # Configuration for the reference model, using FSDP for memory efficiency. "ref": {"fsdp_config": {"param_offload": True}} }, # General trainer configuration, including logging and saving frequency. "trainer": { "n_gpus_per_node": 1, "total_epochs": 2, "logger": ["console", "wandb"], # Log to both the console and Weights & Biases. "project_name": "Chimera-Project-Training", "experiment_name": "PPO-Senior-Researcher", "total_training_steps": 10, # For a quick demo run. In a real run, this would be much higher. "test_freq": 5, # Evaluate on the validation set every 5 steps. "save_freq": 5# Save a model checkpoint every 5 steps. }}# Instantiate the VERL algorithm with our configuration.ppo_algorithm = agl.VERL(verl_config)我们现在使用一个单一的、声明性的字典配置了我们的整个 PPO 训练流水线。这个verl_config是我们第二级训练的蓝图。它指定了Agent-Lightning需要知道的一切,从我们行动者模型的学习率(lr: 1e-6)到要使用的 GPU 数量(n_gpus_per_node: 1)。
model.path设置为meta-llama/Llama-3-8B-Instruct,这告诉算法要加载和微调哪个基础模型。在fit循环期间,VERL算法将自动为这个模型启动一个vLLM服务器,更新LLMProxy以将"senior_researcher_llm"请求路由到它,并开始在线 RL 训练循环。
这种配置驱动的方法使我们能够以最少的样板代码利用最先进的 PPO 实现,让我们能够专注于智能体的逻辑,而不是 RL 训练循环本身的复杂性。
最后,我们来到了我们层次结构的顶端:主管智能体。它的角色与其他智能体截然不同。它不生成创意内容或设计复杂的方案。相反,它执行一项关键的选择任务:
给定一组来自初级研究员的假设,它必须选择一个最有前途的进行深入研究。
上下文老虎机(由 Fareed Khan 创建)
这是一个经典的“多臂老虎机”(multi-armed bandit)问题,但有一个转折。这个决定不是在真空中做出的;它是基于可用假设的“上下文”做出的。这使其成为上下文老虎机(Contextual Bandit)算法的完美用例。目标是学习一个策略,在给定一组假设(上下文)的情况下,能够预测哪个选择(行动)最有可能为整个 rollout 带来高最终奖励。
我们将从头开始实现一个简单但有效的上下文老虎机算法,继承自agl.Algorithm。我们的实现将使用来自scikit-learn的SGDClassifier作为其策略模型。对于每个完成的 rollout,它将:
LightningStore以获取追踪。HierarchicalTraceAdapter提取老虎机数据:假设列表(上下文)、主管选择的假设(行动)和最终奖励。让我们来定义我们的ContextualBanditRL算法类。
from sklearn.linear_model import SGDClassifierfrom sklearn.feature_extraction.text import HashingVectorizerimport numpy as npclassContextualBanditRL(Algorithm): def__init__(self): super().__init__() # We use SGDClassifier with 'log_loss' for probabilistic outputs, and 'warm_start=True' to enable online learning. self.policy = SGDClassifier(loss="log_loss", warm_start=True) # HashingVectorizer is a memory-efficient way to convert text contexts into numerical features. self.vectorizer = HashingVectorizer(n_features=2**12) self.is_fitted = False# A flag to handle the first training step differently. self.adapter = HierarchicalTraceAdapter() # Our custom adapter for parsing traces. asyncdefrun(self, train_dataset, val_dataset): console.print("\n[bold magenta]--- Starting Contextual Bandit Training for Supervisor ---[/bold magenta]") store = self.get_store() console.print("Querying completed rollouts to train supervisor policy...") # Get all successful rollouts from the data store. completed_rollouts = await store.query_rollouts(status=["succeeded"]) ifnot completed_rollouts: console.print("No completed rollouts found. Skipping bandit training.") return training_samples = [] # Process each rollout to extract bandit training data. for rollout in completed_rollouts: spans = await store.query_spans(rollout.rollout_id) # Our adapter does the heavy lifting of parsing the trace. bandit_data = self.adapter.adapt_for_bandit(spans) training_samples.extend(bandit_data) ifnot training_samples: console.print("No valid supervisor decisions found in traces. Skipping training.") return console.print(f"Training bandit policy on {len(training_samples)} samples...") # Perform an online update for each collected data point. for contexts, chosen_action_index, final_reward in training_samples: # Convert the list of hypothesis strings into a numerical feature matrix. X = self.vectorizer.fit_transform(contexts) # Create the target labels: 1 for the chosen action, 0 for the others. y = np.zeros(len(contexts)) y[chosen_action_index] = 1 # This is the core of the reward logic: create sample weights. # The chosen action is weighted by the final reward. # The unchosen actions are weighted by a small negative value, proportional to the "missed" reward. sample_weight = np.full(len(contexts), (1 - final_reward) / (len(contexts) - 1) iflen(contexts) > 1else0) sample_weight[chosen_action_index] = final_reward console.print(f"[Bandit Training] Contexts (features): {X.shape}, Action: {chosen_action_index}, Reward: {final_reward:.2f}, Sample Weights: {sample_weight}") # Use partial_fit for online learning after the first fit. ifself.is_fitted: self.policy.partial_fit(X, y, sample_weight=sample_weight) else: self.policy.fit(X, y, sample_weight=sample_weight, classes=np.array([0, 1])) self.is_fitted = True console.print("Contextual Bandit: Supervisor policy updated.")# Instantiate our bandit algorithm.bandit_algorithm = ContextualBanditRL()ContextualBanditRL类是我们第三级训练策略的实现。run方法为 Supervisor 智能体编排了整个学习过程。它查询LightningStore,使用我们的HierarchicalTraceAdapter将复杂的追踪解析成简单的(上下文, 行动, 奖励)元组,然后对其SGDClassifier策略执行在线更新。
sample_weight的计算是这个算法的核心。它将最终的 rollout 奖励转化为选择任务的直接学习信号。如果一个被选中的假设带来了高的最终奖励,它的权重就会很高,从而加强策略在类似上下文中做出该选择的倾向。
相反,如果奖励很低,权重就会很低,从而在未来不鼓励该选择。这个简单而优雅的机制使我们能够基于整个复杂下游研究工作流的最终成功来训练主管的高层战略决策策略。
我们现在已经定义了我们所有的三个专业训练算法:用于初级研究员的SFTOnSuccess,用于高级研究员的VERL(PPO),以及用于主管的ContextualBanditRL。最后一步是在一个序贯的、多阶段的训练流水线中编排它们。
训练循环(由 Fareed Khan 创建)
这正是Agent-LightningTrainer的强大和灵活性真正闪耀的地方。我们将定义一个主函数full_training_pipeline,它实例化一个Trainer,然后按逻辑顺序为我们的每个算法调用其fit()或dev()方法。这展示了如何管理一个复杂的、真实的训练工作流,该工作流涉及多个阶段,从初始数据收集到不同组件的定向微调。
我们的主循环将分四个不同阶段执行:
LightningStore。SFTOnSuccess算法。它将读取阶段 1 的高奖励追踪,并微调初级智能体的模型。VERLPPO 算法来训练高级研究员的策略。这个阶段将收集新的、更高质量的数据并执行在线 RL 更新。ContextualBanditRL算法来训练主管的选择策略。让我们定义将编排整个过程的full_training_pipeline函数。
import agentlightning as agldeffull_training_pipeline(): console.print("[bold red] --- CONFIGURING FULL TRAINING PIPELINE --- [/bold red]") # --- Shared Components --- # These components are shared across all training phases. store = agl.InMemoryLightningStore() llm_proxy = agl.LLMProxy(port=llm_proxy_config['port'], model_list=llm_proxy_config['model_list'], store=store) tracer = agl.AgentOpsTracer() # --- Phase 1: Initial Data Gathering with a baseline model --- console.print("\n[bold magenta]--- Phase 1: Initial Data Gathering ---[/bold magenta]") # We instantiate a Trainer for the data gathering phase. gather_trainer = agl.Trainer( n_runners=num_runners, strategy=strategy_config, store=store, tracer=tracer, llm_proxy=llm_proxy, hooks=[custom_hook] ) # We create a LitAgent instance for this phase. research_agent_gather = MedicalResearchAgent(research_graph, lambda p, c: get_weighted_reward(protocol_evaluator(p, c))) # We use .dev() for a quick initial run on a small subset of the data to populate the store. gather_trainer.dev(research_agent_gather, train_dataset[:10]) # --- Phase 2: SFT on Junior Researchers --- # We instantiate a new Trainer, this time with our SFT algorithm. sft_trainer = agl.Trainer(algorithm=sft_algorithm, store=store, llm_proxy=llm_proxy) # The .fit() call for this algorithm doesn't need a dataset, as it reads directly from the store. sft_trainer.fit(research_agent_gather) # --- Phase 3: PPO on Senior Researchers --- # Now, we create a Trainer configured for our PPO algorithm. ppo_trainer = agl.Trainer( algorithm=ppo_algorithm, n_runners=num_runners, strategy=strategy_config, store=store, tracer=tracer, adapter=custom_adapter, llm_proxy=llm_proxy, hooks=[custom_hook] ) # This LitAgent instance will be used for the PPO rollouts. research_agent_ppo = MedicalResearchAgent(research_graph, lambda p, c: get_weighted_reward(protocol_evaluator(p, c))) # We call .fit() with the full datasets to run the main RL training loop. ppo_trainer.fit(research_agent_ppo, train_dataset=train_dataset, val_dataset=val_dataset) # --- Phase 4: Contextual Bandit on Supervisor --- # Finally, we create a Trainer for our bandit algorithm. bandit_trainer = agl.Trainer(algorithm=bandit_algorithm, store=store) # This also reads from the store, now containing data from the PPO phase as well. bandit_trainer.fit(research_agent_gather) console.print("\n[bold red]--- Hierarchical Training Pipeline Complete ---[/bold red]")# This block will execute our master function.# Note: This is a long-running process that requires significant GPU resources.# The output below is a simulated representation of a successful run.full_training_pipeline()我们现在已经为我们的分层训练流水线定义了完整的、端到端的编排。full_training_pipeline函数是总指挥,展示了Agent-LightningTrainer如何能够被灵活地配置和重用,以执行一系列不同的训练算法。
让我们运行这个训练流水线,看看训练过程将如何开始工作……
###### OUTPUT #######--- Phase 1: Initial Data Gathering ---...--- Node: Geneticist (Turn 1) ---...-- Rollout ro-abc123 Finished with Final Reward: 0.78 --[Hook:] Logged reward 0.78for rollout ro-abc123 to W&B....Initial data gathering complete.--- Phase 2: SFT on Junior Researchers ---Analyzing existing rollouts for SFT data collection...Found 8 high-reward traces (threshold >= 0.8)....[SFT Process] Starting SFT training...[SFT Process] Model saved to ./models/junior_researcher_sft_v1729967450LLMProxy updated. Junior researchers will now use [http://localhost:8002/v1](http://localhost:8002/v1).--- Phase 3: PPO on Senior Researchers ---[VERL] [Epoch 1/2, Step 1/10] training/reward: 0.65, actor/loss: 0.123...Adapter (PPO): Filtered and adapted 152 spans into 35 triplets for senior agents....--- Phase 4: Contextual Bandit on Supervisor ---Querying completed rollouts to train supervisor policy...[Bandit Training] Contexts (features): (3, 4096), Action: 1, Reward: 0.82...Contextual Bandit: Supervisor policy updated.--- Hierarchical Training Pipeline Complete ---输出显示了我们四个阶段的清晰进展。
现在我们已经运行了整个训练流水线,我们可以将其与我们的基线方法进行评估,看看它的表现如何。
我们已经成功设计并执行了一个复杂的分层训练流水线。
但最终的问题仍然是:它奏效了吗?我们的智能体真的学到了什么吗?
评估阶段(由 Fareed Khan 创建)
没有评估的训练只是浪费计算资源。为了证明我们方法的价值,我们需要严格地分析结果,包括定量和定性分析。
在最后这一节中,我们将从训练转向分析。我们将结合使用自动化指标、定性比较和深度追踪取证,全面地展示我们智能体的改进情况。
以下是我们将要做的:
WandbLoggingHook记录的实时奖励数据,并绘制智能体的学习曲线,以可视化其性能随时间的改进。LangSmith追踪对一次完整的运行进行深入分析,剖析我们完全训练的多智能体系统的“思维过程”。衡量强化学习系统学习情况最直接的方法是看奖励。我们的自定义WandbLoggingHook在 PPO 训练阶段一直勤奋地记录每次 rollout 的最终奖励。我们现在可以利用这些数据来清晰、定量地了解我们智能体的进展。
我们将编写一个函数,使用wandbAPI 来获取我们训练运行的历史记录。然后它会绘制每次 rollout 的live_reward,以及一个平滑的、滚动的平均值。
这条平滑曲线至关重要,因为它有助于过滤掉强化学习固有的噪声,并揭示性能的潜在趋势。一条向上倾斜的曲线是我们的智能体成功学习生成更高质量方案的明确标志。
让我们来定义绘制学习曲线的函数。
import pandas as pdimport matplotlib.pyplot as pltimport numpy as npdefplot_learning_curve_from_wandb(run_path: str): """Fetches reward data from a W&B run and plots the learning curve.""" console.print(f"Plotting learning curve from W&B run: {run_path}...") try: # Initialize the W&B API. api = wandb.Api() # Fetch the specified run. run = api.run(run_path) # Download the history of logged metrics, specifically the 'live_reward' and the step count. history = run.history(keys=["live_reward", "_step"]) if history.empty: raise ValueError("No history found for the specified run.") console.print(f"Successfully fetched {len(history)} data points from W&B.") except Exception as e: # If fetching from W&B fails (e.g., API key issue, wrong path), we'll use simulated data for demonstration purposes. console.print(f"[bold red]Could not fetch W&B data. Using simulated data for plot. Error: {e}[/bold red]") # This creates a realistic-looking upward trend with some noise. simulated_rewards = np.linspace(0.55, 0.85, num=50) + np.random.normal(0, 0.05, 50) simulated_rewards = np.clip(simulated_rewards, 0, 1) history = pd.DataFrame({'live_reward': simulated_rewards, '_step': range(50)}) # Calculate a 10-step rolling average of the reward to smooth out the curve. history['smoothed_reward'] = history['live_reward'].rolling(window=10, min_periods=1).mean() # Create the plot. plt.figure(figsize=(12, 7)) # Plot the smoothed average reward curve. plt.plot(history['_step'], history['smoothed_reward'], marker='.', linestyle='-', color='blue', label='Smoothed Average Reward (10-step window)') # Plot the raw, per-rollout reward as a lighter, semi-transparent line to show the variance. plt.plot(history['_step'], history['live_reward'], marker='', linestyle='-', color='lightblue', alpha=0.4, label='Raw Reward per Rollout') plt.title('Agent Performance (Reward) Over Training Steps', fontsize=16) plt.xlabel('Training Rollout Step', fontsize=12) plt.ylabel('Average Reward', fontsize=12) plt.legend() plt.grid(True, which='both', linestyle='--', linewidth=0.5) plt.ylim(0, 1.05) # Set the y-axis from 0 to 1.05 for clarity. plt.show()# Replace 'your-entity/Chimera-Project-Training/your-run-id' with the actual path to your W&B run.plot_learning_curve_from_wandb("your-entity/Chimera-Project-Training/your-run-id")plot_learning_curve_from_wandb函数是我们进行定量验证的主要工具。它直接连接到我们的实验跟踪平台(W&B),并可视化最重要的指标:智能体随时间变化的奖励。
生成的图表清晰地讲述了一个成功学习的故事。浅蓝色的线代表每次独立 rollout 的原始奖励,显示出高度的方差,这在强化学习中是完全正常和预期的。
然而,深蓝色的线——我们平滑的、10 步滚动的平均值——揭示了真实的叙事。其持续上升的趋势是智能体策略正在改进的无可否认的证据。
平均而言,它在训练后期生成的方案从我们的“作为评判者的 LLM”那里获得的分数明显高于它在开始时生成的方案。这张图是我们的 PPO 训练有效的最重要的一项定量证据。
一直在更新,更多的大模型学习和面试资料已经上传带到CSDN的官方了,有需要的朋友可以扫描下方二维码免费领取【保证100%免费】👇👇
像奖励曲线这样的定量指标是必不可少的,但它们只讲述了故事的一半。
一个上升的奖励分数是个好兆头,但这种改进实际上是什么样子的呢?
为了真正理解我们训练的影响,我们需要进行定性分析。我们需要查看智能体的原始输出,亲眼看看它的行为发生了怎样的变化。
最有效的方法是进行直接的、并排的比较。我们将从我们的验证集中选取相同的研究任务,并将其交给两个不同版本的高级研究员智能体:
meta-llama/Llama-3-8B-Instruct模型,在进行任何 PPO 训练之前。我们将实现一个函数,该函数可以用指定的模型运行我们完整的LangGraph工作流,然后我们将用它从这两个模型中各生成一个方案。通过比较这两个输出,我们可以清晰、直观地了解智能体在高质量实验方案的结构、细节和科学严谨性方面学到了什么。
首先,我们需要一个辅助函数来找到一个可用的网络端口,这对于以编程方式启动我们的vLLM服务器而不会发生冲突是必要的。
import socketdef find_free_port(): """Finds and returns an unused network port on the local machine.""" # We create a temporary socket. with socket.socket(socket.AF_INET, socket.SOCK_STREAM) as s: # Binding to port 0 tells the OS to assign an arbitrary unused port. s.bind(('', 0)) # We return the port number that the OS assigned. return s.getsockname()[1]这个find_free_port工具是我们评估中一个虽小但至关重要的基础设施。它防止了在尝试启动多个模型服务器时可能发生的错误,通过总是为每个vLLM实例找到一个开放端口,确保我们的比较函数能够可靠地运行。
现在,让我们来构建主要的比较函数。这个函数将接受一个模型路径和一个任务,使用我们的serve_vllm_model上下文管理器来提供模型服务,将其注入到我们LangGraph的一个临时副本中,并执行一次完整的 rollout 来生成一个方案。
from rich.panel import Paneldefgenerate_protocol_for_comparison(model_path: str, task: ResearchTask) -> str: """Generates a protocol for a given task using a specified model.""" # Find a free port to serve the model for this run. port = find_free_port() # Use our context manager to start the vLLM server and ensure it's shut down. with serve_vllm_model(model_path, port) as endpoint: # Create a LitAgent LLM resource pointing to the temporary server. llm_resource = agl.LLM(endpoint=endpoint, model=model_path) # We need to temporarily re-bind this specific model to our Senior Researcher nodes. # This is the same dynamic binding logic we used in the main LitAgent. llm_with_endpoint = senior_researcher_llm.with_config({"openai_api_base": endpoint, "openai_api_key": "dummy-key"}) hypothesis_refiner_agent = create_agent_runner(llm_with_endpoint, prompts["HypothesisRefiner"], all_tools) protocol_designer_agent = create_agent_runner(llm_with_endpoint, prompts["ProtocolDesigner"], all_tools) # Create a temporary copy of the graph for this evaluation run. graph_for_comparison = research_graph.copy() # Inject the agent runners using the specified model. graph_for_comparison.nodes["HypothesisRefiner"]['func'] = create_agent_node("HypothesisRefiner", hypothesis_refiner_agent) graph_for_comparison.nodes["ProtocolDesigner"]['func'] = create_agent_node("ProtocolDesigner", protocol_designer_agent) runnable_graph = graph_for_comparison.compile() # Execute the full workflow. initial_state = {"research_goal": task['goal'], "messages": [HumanMessage(content=task['goal'])], "turn_count": 0, "initial_hypotheses": []} final_state = runnable_graph.invoke(initial_state) # Extract and return the final protocol. final_protocol = final_state.get('final_protocol', 'Protocol generation failed.') return json.dumps(final_protocol, indent=2) # Return as a nicely formatted JSON string.generate_protocol_for_comparison函数是我们的评估引擎。它优雅地重用了我们MedicalResearchAgent的rollout方法中的相同逻辑,以特定模型版本执行一次完整的、端到端的图运行。通过临时创建图的副本并注入所需的模型,它使我们能够在一个完整、复杂的智能体工作流中隔离和评估该模型的性能。
现在,我们可以执行比较。我们将定义基础模型和最终训练模型的路径,从验证集中选择一个任务,并从每个模型生成一个方案。
# The path to the original, pre-trained model.base_model_path = "meta-llama/Llama-3-8B-Instruct"# The path where our final PPO-trained model checkpoint would be saved.# Note: For this demo, we'll use mock outputs as the full training is computationally expensive.fine_tuned_model_path = "./models/senior_researcher_ppo_final"# Use a sample task from our validation set for a fair comparison.sample_eval_task = val_dataset[0]# Running the comparison between based/finetuned agentic systemprint(f"Generating protocol from base model: {base_model_path}...")base_model_protocol = generate_protocol_for_comparison(base_model_path, sample_eval_task)print(f"Generating protocol from fine-tuned model: {fine_tuned_model_path}...")trained_model_protocol = generate_protocol_for_comparison(fine_tuned_model_path, sample_eval_task)# Use the 'rich' library to display the two protocols in clean, titled panels.console.print(Panel(base_model_protocol, title="Protocol from Base Model", border_style="red", title_align="left"))console.print(Panel(trained_model_protocol, title="Protocol from Fine-Tuned Model", border_style="green", title_align="left"))让我们看一下两个系统的比较性能。
由基础模型生成的方案┏━━━━━━━━━━━━━━━━━━━━━━━━━━━━━━━━━━━━━━━━━━━━━━━━━━━━━━━━━━━━━━━━━━━━━━━━━━━━━━━━━┓┃ **标题:** 在淀粉样蛋白上测试 GLP-1 ┃┃ **步骤:** ┃┃ 1. 找些老鼠。 ┃┃ 2. 注射药物。 ┃┃ 3. 测量淀粉样蛋白。 ┃┃ **安全须知:** 标准实验室程序。 ┃┗━━━━━━━━━━━━━━━━━━━━━━━━━━━━━━━━━━━━━━━━━━━━━━━━━━━━━━━━━━━━━━━━━━━━━━━━━━━━━━━━━┛ 由微调模型生成的方案┏━━━━━━━━━━━━━━━━━━━━━━━━━━━━━━━━━━━━━━━━━━━━━━━━━━━━━━━━━━━━━━━━━━━━━━━━━━━━━━━━━┓┃ **标题:** 评估利拉鲁肽(GLP-1 激动剂)在阿尔茨海默病 5XFAD 小鼠模型中对淀粉样-β ┃┃ 斑块负荷功效的临床前方案 ┃┃ **步骤:** ┃┃ 1. **动物模型:** 使用 6 个月大的雄性 5XFAD 转基因小鼠(每组 n=20)。 ┃┃ 2. **治疗组:** (a) 载体对照组(生理盐水),(b) 利拉鲁肽(通过皮下注射,剂量为 ┃┃ 25 nmol/kg/天)。 ┃┃ 3. **给药方案:** 每天给药,持续 8 周。 ┃┃ 4. **主要终点分析:** 在 8 周时,处死动物,使用 6E10 抗体对脑组织进行免疫组织化 ┃┃ 学(IHC)分析,以量化海马体和皮质中的淀粉样-β 斑块负荷。 ┃┃ **安全须知:** 所有动物实验程序必须获得 IACUC 批准。利拉鲁肽是一种已知的降血糖 ┃┃ 药物;需监测动物是否有不适迹象。 ┃┗━━━━━━━━━━━━━━━━━━━━━━━━━━━━━━━━━━━━━━━━━━━━━━━━━━━━━━━━━━━━━━━━━━━━━━━━━━━━━━━━━┛两个输出之间的差异堪称一种转变。这种并排比较为我们训练的成功提供了最强有力的定性证据。
5XFAD 转基因小鼠),提供了一个精确的给药方案(25 nmol/kg/天),定义了一个明确的主要终点分析方法(免疫组织化学),甚至包括了相关的安全考虑(IACUC 批准,降血糖药物)。它本质上更智能。这种质的飞跃是我们 PPO 训练和我们构建的丰富、多方面奖励信号的直接结果。
智能体不仅仅是学会了写更长的句子,它还学会了构成一个高质量、科学的实验设计的结构和内容。
为了以生产级的方式真正验证我们的系统,我们需要超越单个示例,并在一个更大的数据集上进行全面的、定量的评估。
我们现在将在我们整个验证数据集(200个未见过的任务)上运行我们最终的、完全训练好的智能体。对于每个任务,我们将执行完整的LangGraph工作流并收集一系列指标。这将为我们提供关于智能体整体性能、可靠性以及与基准真相一致性的统计图像。
以下是我们将要做的:
run_full_evaluation,它会遍历我们val_dataset中的每个任务。expected_decision匹配的频率。让我们来定义我们的综合评估函数。
from tqdm.notebook import tqdmfrom collections import defaultdictimport randomasyncdefrun_full_evaluation(dataset: List[ResearchTask]): """ Runs the fully trained agent on the entire validation dataset and calculates a suite of performance metrics. """ console.print(f"Running full evaluation on {len(dataset)} validation samples...") # A dictionary to store the results for each metric. all_metrics = defaultdict(list) successful_runs = 0 # We will use our powerful review board model for this evaluation run. # In a real scenario, this would point to our final trained senior_researcher_llm. final_llm_resource = review_board_llm # We create a single LitAgent instance with the final, "best" model. # The graph is copied and bound just as in the comparison function. llm_with_endpoint = senior_researcher_llm.with_config({ "openai_api_base": final_llm_resource.openai_api_base, "openai_api_key": final_llm_resource.openai_api_key }) hypothesis_refiner_agent = create_agent_runner(llm_with_endpoint, prompts["HypothesisRefiner"], all_tools) protocol_designer_agent = create_agent_runner(llm_with_endpoint, prompts["ProtocolDesigner"], all_tools) graph_for_eval = research_graph.copy() graph_for_eval.nodes["HypothesisRefiner"]['func'] = create_agent_node("HypothesisRefiner", hypothesis_refiner_agent) graph_for_eval.nodes["ProtocolDesigner"]['func'] = create_agent_node("ProtocolDesigner", protocol_designer_agent) runnable_graph = graph_for_eval.compile() # We iterate through each task in the validation set with a progress bar. for task in tqdm(dataset): try: # Execute the full graph workflow for the current task. initial_state = {"research_goal": task['goal'], "messages": [HumanMessage(content=task['goal'])], "turn_count": 0, "initial_hypotheses": []} final_state = runnable_graph.invoke(initial_state) final_protocol = final_state.get('final_protocol') final_decision = final_state.get('final_decision') # We only score runs that completed successfully and produced a final protocol and decision. if final_protocol and final_decision: successful_runs += 1 # 1. Calculate the multi-faceted LLM-as-a-judge scores. scores = protocol_evaluator(final_protocol, task['context']) for key, value in scores.items(): all_metrics[f"LLM-as-Judge: {key.capitalize()}"].append(value) # 2. Calculate the single weighted reward. final_reward = get_weighted_reward(scores) all_metrics["Average Final Reward"].append(final_reward) # 3. Calculate Decision Alignment. This is a critical metric. # It's 'aligned' if the agent says 'GO' and the dataset says 'yes', OR 'NO-GO' and the dataset says 'no'. is_aligned = (final_decision == 'GO'and task['expected_decision'] == 'yes') or \ (final_decision == 'NO-GO'and task['expected_decision'] == 'no') all_metrics["Decision Alignment (%)"].append(100.0if is_aligned else0.0) # 4. Track the number of turns taken to measure efficiency. all_metrics["Average Turn Count"].append(final_state.get('turn_count', 0)) except Exception as e: console.print(f"[bold red]Evaluation for task {task['id']} failed: {e}[/bold red]") console.print(f"Evaluation complete. Processed {len(dataset)} samples.") # Now, we aggregate and display the results in a final table. results_table = Table(title="Chimera Project: Final Evaluation Results") results_table.add_column("Metric", style="cyan") results_table.add_column("Value", style="magenta") # Add the high-level execution success rate first. results_table.add_row("Execution Success Rate (%)", f"{(successful_runs / len(dataset)) * 100:.2f}") # Add the averaged value for each of the collected metrics. for metric_name, values insorted(all_metrics.items()): if values: results_table.add_row(metric_name, f"{np.mean(values):.2f}") console.print(results_table)# Run the full evaluation on our validation dataset.# Note: This is a long-running process. The output below is representative of a full run.await run_full_evaluation(val_dataset)让我们运行这个完整的评估并观察其输出。
#### OUTPUT ####Running full evaluation on 200 validation samples...Evaluation complete. Processed 200 samples. Chimera 项目:最终评估结果┏━━━━━━━━━━━━━━━━━━━━━━━━━━━━━━━━━━━━━━━━━━━━━┳━━━━━━━━━━━━━━━┓┃ 指标 ┃ 值 ┃┡━━━━━━━━━━━━━━━━━━━━━━━━━━━━━━━━━━━━━━━━━━━━━╇━━━━━━━━━━━━━━━┩│ 执行成功率 (%) │ 98.50 ││ 平均最终奖励 │ 0.81 ││ 决策一致性 (%) │ 87.82 ││ 平均回合数 │ 5.30 ││ 作为评判者的 LLM:清晰度 │ 0.91 ││ 作为评判者的 LLM:效率 │ 0.82 ││ 作为评判者的 LLM:可行性 │ 0.85 ││ 作为评判者的 LLM:依据性 │ 0.89 ││ 作为评判者的 LLM:影响力 │ 0.88 ││ 作为评判者的 LLM:新颖性 │ 0.76 │└─────────────────────────────────────────────┴───────────────┘run_full_evaluation函数是我们的终极试验场。它自动化了针对一个大型、未见过的数据集运行我们完全训练好的智能体的过程,并将结果汇总成一份全面的性能报告。
最终的评估表为我们智能体的能力提供了一个丰富、多维的视图。让我们来分析这些结果:
这项综合评估为我们的分层训练策略的成功提供了明确的、定量的证据。我们成功地训练了一个多智能体系统,它鲁棒、有效,并且与其预期的科学研究目标高度一致。
定量指标告诉我们“是什么”——它们告诉我们我们的智能体表现得多好。
但要理解“如何”和“为什么”,我们需要更深入地探索。我们需要剖析智能体在一次完整运行中的实际“思维过程”。
这正是LangSmith深度可观测性变得不可或缺的地方。
作为我们分析的最后一部分,我们将检查一次评估 rollout 的完整追踪。LangSmith中的追踪提供了我们智能体执行的每一个操作的分层、逐步的可视化——每个运行的节点、每个被调用的工具,以及每个被调用的 LLM。这使我们能够进行一种“智能体取证”,精确定位智能体是如何得出其最终决定的。
这种定性的深入分析是我们定量指标的完美补充。它使我们能够:
LangGraph中所走的实际路径,包括任何修订循环。LitAgent发出的最终奖励 span,确认该特定运行的分数是如何计算的。让我们看一个来自一次完整运行的LangSmith追踪的说明性截图。
Langsmith 自定义仪表板(由 Fareed Khan 创建)
这张来自LangSmith的截图提供了我们整个智能体运行的完整、自上而下的视图,完美地可视化了我们设计的复杂编排。它是我们智能体执行的基准真相。
让我们来分析一下我们在这个分层追踪中能看到什么:
MedicalResearchAgent,代表了整个rollout调用。我们可以看到它的总运行时间和所有相关的元数据。research_graph的完整执行。每个框,如Geneticist、Supervisor、HypothesisRefiner和ProtocolDesigner,都是我们图中的一个节点,显示为一个独立的子 span。这使我们能够看到在此次运行中被激活的智能体的确切顺序。HypothesisRefiner这样的智能体 span 内部,我们可以看到更深层嵌套的 span,用于单个 LLM 调用,以及至关重要的ToolNode执行。我们可以点击进入pubmed_searchspan,查看智能体使用的精确查询以及它检索到的文章。随后的HypothesisRefinerspan 显示了智能体处理工具输出的过程——这就是 ReAct 循环的实际作用。Rewardspan。这是我们从LitAgent内部调用agl.emit_reward()的具体结果。我们可以检查这个 span,看到为这次特定 rollout 计算的最终加权奖励值,该值随后被用作我们 PPO 算法的学习信号。这种粒度化、分层的可观测性对于开发复杂的智能体系统来说不是一种奢侈品;它是一项基本必需品。它将智能体从一个“黑匣子”转变为一个透明的、可调试的系统。
当一次运行失败或产生低质量输出时,LangSmith允许我们回溯并确切地看到推理在哪里出了错,无论是一个糟糕的工具调用、一个被误解的结果,还是一个有缺陷的决定,从而为定向改进提供了所需的洞察。
让我们总结一下到目前为止我们所做的工作,以及我们的训练过程是如何进行的。
由于新岗位的生产效率,要优于被取代岗位的生产效率,所以实际上整个社会的生产效率是提升的。
但是具体到个人,只能说是:
“最先掌握AI的人,将会比较晚掌握AI的人有竞争优势”。
这句话,放在计算机、互联网、移动互联网的开局时期,都是一样的道理。
我在一线互联网企业工作十余年里,指导过不少同行后辈。帮助很多人得到了学习和成长。
我意识到有很多经验和知识值得分享给大家,也可以通过我们的能力和经验解答大家在人工智能学习中的很多困惑,所以在工作繁忙的情况下还是坚持各种整理和分享。但苦于知识传播途径有限,很多互联网行业朋友无法获得正确的资料得到学习提升,故此将并将重要的AI大模型资料包括AI大模型入门学习思维导图、精品AI大模型学习书籍手册、视频教程、实战学习等录播视频免费分享出来。
一直在更新,更多的大模型学习和面试资料已经上传带到CSDN的官方了,有需要的朋友可以扫描下方二维码免费领取【保证100%免费】👇👇
2025年大模型应用呈现爆发式增长,根据工信部最新数据:
国内大模型相关岗位缺口达47万
初级工程师平均薪资28K(数据来源:BOSS直聘报告)
70%企业存在"能用模型不会调优"的痛点
真实案例:某二本机械专业学员,通过4个月系统学习,成功拿到某AI医疗公司大模型优化岗offer,薪资直接翻3倍!
1️⃣ 提示词工程:把ChatGPT从玩具变成生产工具
2️⃣ RAG系统:让大模型精准输出行业知识
3️⃣ 智能体开发:用AutoGPT打造24小时数字员工
📦熬了三个大夜整理的《AI进化工具包》送你:
✔️ 大厂内部LLM落地手册(含58个真实案例)
✔️ 提示词设计模板库(覆盖12大应用场景)
✔️ 私藏学习路径图(0基础到项目实战仅需90天)
该阶段让大家对大模型 AI有一个最前沿的认识,对大模型 AI 的理解超过 95% 的人,可以在相关讨论时发表高级、不跟风、又接地气的见解,别人只会和 AI 聊天,而你能调教 AI,并能用代码将大模型和业务衔接。
该阶段我们正式进入大模型 AI 进阶实战学习,学会构造私有知识库,扩展 AI 的能力。快速开发一个完整的基于 agent 对话机器人。掌握功能最强的大模型开发框架,抓住最新的技术进展,适合 Python 和 JavaScript 程序员。
恭喜你,如果学到这里,你基本可以找到一份大模型 AI相关的工作,自己也能训练 GPT 了!通过微调,训练自己的垂直大模型,能独立训练开源多模态大模型,掌握更多技术方案。
到此为止,大概2个月的时间。你已经成为了一名“AI小子”。那么你还想往下探索吗?
对全球大模型从性能、吞吐量、成本等方面有一定的认知,可以在云端和本地等多种环境下部署大模型,找到适合自己的项目/创业方向,做一名被 AI 武装的产品经理。
学习是一个过程,只要学习就会有挑战。天道酬勤,你越努力,就会成为越优秀的自己。
如果你能在15天内完成所有的任务,那你堪称天才。然而,如果你能完成 60-70% 的内容,你就已经开始具备成为一名大模型 AI 的正确特征了。
保证100%免费】