背景:
随着业务形态,业务种类的不断拓展,使用公版 ISO 安装树 与 ISO 镜像存在较大的不便与弊端;
存在安装配置不统一,溯源难等特点;给后期的系统运维带来很高的复杂度
目的:
- 解决业务需要多种不同系统需求,版本管理困难,溯源难, 运维排障复杂度高等痛点问题
- 适应新型态下的多种类装机需求,灵活支持,便于迭代更新
- 自定义的软件包组设置,结合 kickstart 应答控制文件 结合 沙箱技术与 iPXE 技术可以使用大规模自动化装机部署
术语与缩写:
| 术语名称 | 术语解释 |
|---|---|
| RHEL | 全称为 Redhat Enterprise Linux ,为红帽子公司推出的免费开源的 Linux 商业发行版 |
| CentOS | CentOS 为基于 RHEL 上游释放的源码去掉 RHEL logo 与商业软件后重新编码的再发行版,CentOS 社区已被 RHEL 收编,目前 CentOS-7 版本于2020年结束主流支持 |
| Fedora | Fedora 目前已被 Redhat 收编,红帽子用来实验一些新技术在此发行版,稳定后移植到 RHEL |
| kickstart | 红帽系发行版操作系统的自动化部署控制脚本与方法 |
| ISO | 一种文件格式与标准 |
| BIOS | 基本输入输出系统,为X86架构的计算机的底层的软件 |
| EFI/UEFI | 统一可扩展固件;为全新的一种计算机的底层软件,支持多种新处理器架构 |
| RPM | redhat package management 红帽子包管理系统 |
| Anaconda | anaconda 为红帽系发行版的 安装器(installer)程序 |
| grub | 当代 linux 发行版的主流的引导程序 |
| xml | 一种文件格式与标准 |
| dd | linux 下的一种操作裸磁盘块的工具 |
| yum | yellow dog package management 黄狗包管理系统,是红帽系自动管理RPM依赖关系,自动安装软件包的一种工具,python 编写 |
| python | 当代的流行的一种解释性的语言 |
| GPL | 一种开源协议 |
原 CentOS 社区官方基于 RHEL 构建二进制兼容版本的基本流程:
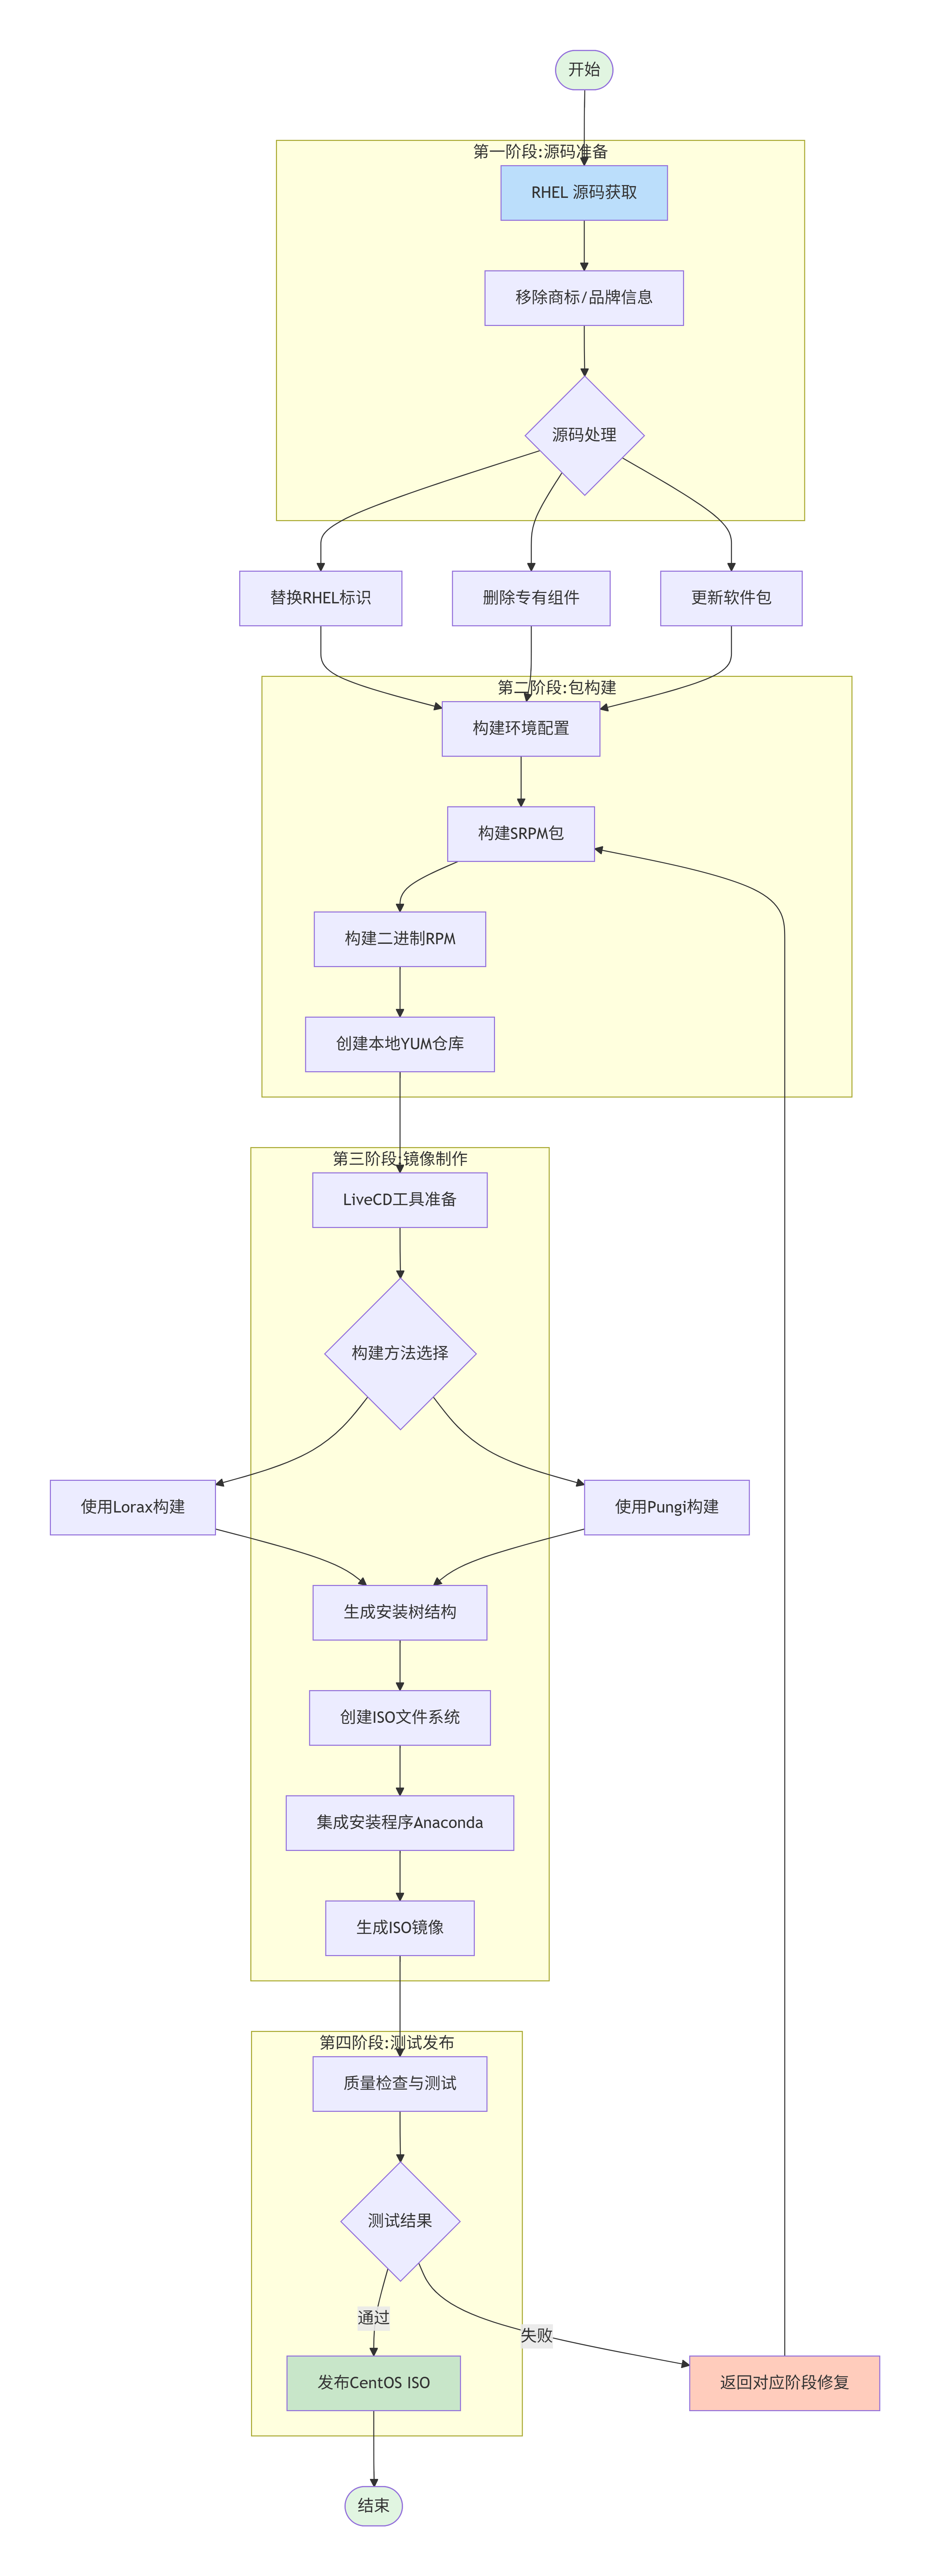
根据实际需求出发,选择基本CentOS 社区版本进行二次定制开发
二次定制开发的流程大致如下:
- 分析公版 minimal 镜像 ISO 文件结构
- 抽取拷贝原公版 ISO 中的所有文件与目录结构到 二次定制开发路径,并需要留意修复抽取 ISO 后部分长文件名文件后缀名丢失的问题
- 根据需求收集需要的 RPM 软件包与依赖包放置在 Packages 目录下
- 根据需求收集需求的 RPM 名字,修改适配软件组的主控文件 XML 文件 repodata/cca56f3cffa18f1e52302dbfcf2f0250a94c8a37acd8347ed6317cb52c8369dc-c7-x86_64-comps.xml
- 根据上述修改后的 XML 与 Packages 中的包重新生成 repodatas 中的 ISO RPM包的 repo 数据库
- 定制修改 anaconda installer 安装器。并输出新的 boot.iso ,用于替换旧的 ISO 中的 vmlinux initrd.img 以及 suqashfs.img
- 添加需要的额外拷贝的工具或者文件包到 ISO 构建目录
- 修改原生的 BIOS 模式与 UEFI 模式下的 grub 引导配置文件
- 按需修改添加 ks 文件到 ISO 中 (可选步骤)
- 封装打包为 ISO 镜像,为了支持超大单个文件输出为 UDF 格式
- 嵌入 hybrid 启动 与 MD5 指纹到 ISO 中
- 测试安装 ISO
- 发布
定制需求
- 基于公版 centos 7.9 minimal 镜像二次定制开发
- 定制修改 anaconda installer 支持高级功能
- 软件组越小越好,需要支持基本的容器项目的正常运行
- 需要自动化安装无需人工干预
- 系统盘分区采用标准分区
- 根据主流的 CSI benchmark 安全红线要求,设置用户的密码强度要求,弱密码不准使用
- 首次登录必须更改密码
- 默认不开防火墙与 selinux 服务
- 默认系统为英语环境,美式键盘,上海时区
- 默认增大系统单个进程能打开的句柄数到 65536*2
- 默认启用 root用户的 ssh 访问
- 采用图形化安装界面
- 默认系统盘选盘逻辑要适应多盘位的使用场景,支持多种类型的磁盘,支持 vmware与 KVM 虚拟机部署
- 增加的个性化的定制化信息
- 支持放入超大的软件包超过 4GB
- 支持使用U盘刻录安装,支持带外 BMC 挂载 ISO 安装,刻录 cd/dvd 安装
- 支持 UEFI 与 BIOS 两种引导方式
- 默认系统需要禁用 CPU C-stat 省电,安装完后的系统中删除ks文件,防止泄密
- 默认需要开启 KDUMP 服务
- 默认需要关闭不必要的后台服务
- 系统默认网络采用 DHCP,无需设置主机名
- 系统默认预置两个用户,一个 root 用户,一个 isotest 用户; root 用户密码为 XXXXX; iso_test 用户默认密码为 isotest
- 系统默认密码文件采用影子形式加密存储
原版社区的 ISO 镜像(俗称公版ISO镜像)树的结构解析:
公版的 CentOS-2009-Minimal_x86_64.iso 镜像文件,将镜像挂载到 /media 目录可以看到 ISO 抽取后的文件目录结构如下:
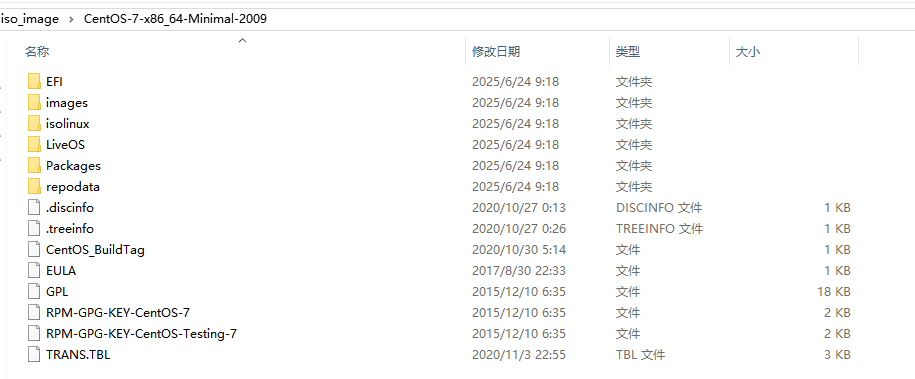
目录说明:
- EFI 存放EFI 模式的引导文件
- images 存放efi 文件与PXE 启动的内核与临时跟文件系统文件 (stage1 image 目录)
- isolinux 存放 BIOS 模式引导文件 (stage1 image 目录)
- LiveOS 存放 Anaconda installer 的目录(stage2 image 目录)
- Packages 存放 RPM 软件包的目录
- repodata 存放 RPM 软件组元数据的目录
- 文件说明:
- CentOS_BuildTag CentOS 构建标签
- .discinfo 记录构建 ISO 时间戳,ISO架构信息,版本号
- .treeinfo 记录构建 ISO 中重要文件的配置文件
- RPM-GPG-KEY-CentOS-7 RPM 包的 GPG KEY
- RPM-GPG-KEY-CentOS-Testing-7 RPM 包的 GPG KEY
- .TBL 记录 ISO 生成时的文件名转换的文件
- EULA 用户协议文档
- GPL CentOS 的开源协议
BIOS 模式 ISO 启动流程:
BIOS 模式: server 启动 ---- > BIOS POST ----- > BIOS 选择选择从 CD/DVD 启动 ----- > ISO 读取启动扇区偏移 ---- > (isolinux/isolinux.bin)grub2 程序 ---- > 读取 isolinux/isolinux.cfg 启动菜单(stage1 阶段 ) ----- > 按照菜单的配置 stage2 阶段 加载 isolinux/vmlinuz 内核 + isolinux/initrd.img ----- > (切换加载 安装器 anaconda installer rootfs LiveOS/squashfs.img ) ----- > (加载基础的各类 systemd 服务) ------ > 启动默认的 default-target 实际指向 ----- > anaconda.service ----- > 启动 anaconda 图形安装界面 or anaconda text 安装界面 ----- > 手动选择安装 or kickstart 自动安装
UEFI 模式: server 启动 ---- > BIOS POST ----- > UEFI 选择选择从 CD/DVD 启动 ----- > ISO 读取 EFI BOOT 信息---- > grub2 程序(BOOTX64.EFI) ---- > 读取 EFI/BOOT/grub.cfg 启动菜单(stage1 阶段 ) ----- > 按照菜单的配置 stage2 阶段 加载 image/pxeboot/vmlinuz 内核 + image/pxeboot/initrd.img ----- > (切换加载 安装器 anaconda installer rootfs LiveOS/squashfs.img) ----- > (加载基础的各类 systemd 服务) ------ > 启动默认的 default-target 实际指向 ----- > anaconda.service ----- > 启动 anaconda 图形安装界面 or anaconda text 安装界面 ----- > 手动选择安装 or kickstart 自动安装
引导菜单定制开发:
背景:
引导菜单的设计分为两类,一种是传统的 BIOS 类型引导,一种是 UEFI/EFI 类型的引导;
其中BIOS类型的引导目前使用的是开源的 syslinux 组件中的 isolinux 部分组件实现的, 而 EFI/UEFI 模式则采用 grubx64.efi 或 BOOTX64.EFI 完成引导
实现方法逻辑两种类型引导的原版引导文件打开进行走读,掌握两种模式的引导菜单的语法,格式,参数等等;
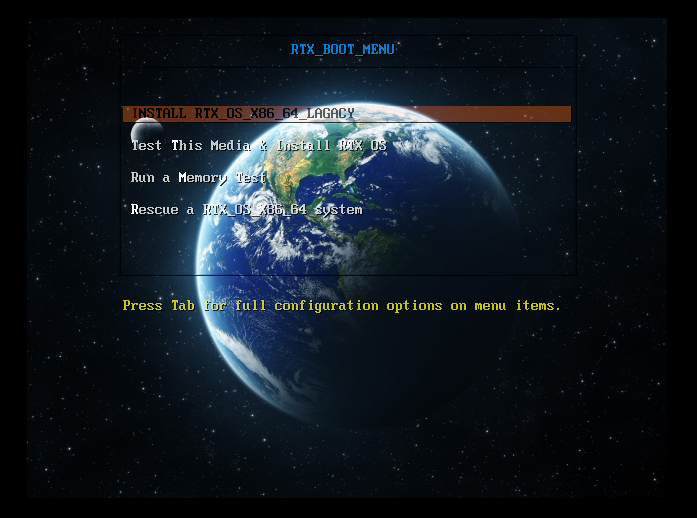
主要修改点是修改引导时指定的安装菜单的标签名称,stage2 阶段映像的加载的媒介的标签,以及添加获取自动安装 ks 的内核传参,外加一些额外的内核参数 ; 定制的图形启动菜单背景图 LOGO 信息也可以写在里面,但是目前图形化的引导菜单支持目前 BIOS 模式支持比较好,UEFI 模式不做处理于支持
修改后的配置文件示意:
BIOS 模式启动菜单: 引导文件为 ISO目录中的 isolinux/isolinux.cfg 文件
prompt 1
ui vesamenu.c32
menu background splash.jpg
default kickstartMENU TITLE RTX-9090 Linux BOOT MENUtimeout 50# Do not display the actual menu unless the user presses a key. All that is displayed is a timeout message.menu tabmsg Press Tab for full configuration options on menu items.menu separator # insert an empty line
menu separator # insert an empty linelabel kickstartmenu label ^INSTALL RTXOS X86_64 LAGACYkernel vmlinuzappend initrd=initrd.img inst.stage2=hd:LABEL=rtxOS:/ inst.ks=hd:LABEL=rtxOS:/ks.cfg vga=791 modprobe.blacklist=nouveaumenu separator # insert an empty linelabel isocheckmenu label Test This Media && Install RTXOS kernel vmlinuzappend initrd=initrd.img inst.stage2=hd:LABEL=rtxOS:/ inst.ks=hd:LABEL=rtxOS:/ks.cfg rd.live.check quiet vga=791 modprobe.blacklist=nouveaumenu separator # insert an empty linelabel memtestmenu label Run a ^Memory Testtext helpIf your system is having issues, a problem with yoursystem's memory may be the cause. Use this utility tosee if the memory is working correctly.endtextkernel memtestmenu separator # insert an empty linelabel rescuemenu indent count 5menu label ^Rescue a RTXOS systemtext helpIf the system will not boot, this lets you access filesand edit config files to try to get it booting again.endtextkernel vmlinuzappend initrd=initrd.img inst.stage2=hd:LABEL=rtxOS:/ rescue vga=791 modprobe.blacklist=nouveaumenu separator # insert an empty line
menu separator # insert an empty linemenu end
UEFI 模式下的启动菜单:
set default="1"function load_video {insmod efi_gopinsmod efi_ugainsmod video_bochsinsmod video_cirrusinsmod all_video
}load_video
set gfxpayload=keep
insmod gzio
insmod part_gpt
insmod ext2set timeout=5
### END /etc/grub.d/00_header ###search --no-floppy --set=root -l 'rtxOS'### BEGIN /etc/grub.d/10_linux ###menuentry 'Test This Media & Install RTXOS X86_64 UEFI' --class fedora --class gnu-linux --class gnu --class os {linuxefi /images/pxeboot/vmlinuz rd.live.check inst.stage2=hd:LABEL=rtxOS:/ inst.ks=hd:LABEL=rtxOS:/ks.cfg vga=791 modprobe.blacklist=nouveauinitrdefi /images/pxeboot/initrd.img
}
menuentry 'INSTALL RTXOS X86_64 UEFI' --class fedora --class gnu-linux --class gnu --class os {linuxefi /images/pxeboot/vmlinuz inst.stage2=hd:LABEL=rtxOS:/ inst.ks=hd:LABEL=rtxOS:/ks.cfg vga=791 modprobe.blacklist=nouveauinitrdefi /images/pxeboot/initrd.img
}
menuentry 'Rescue A RTXOS System' --class fedora --class gnu-linux --class gnu --class os {linuxefi /images/pxeboot/vmlinuz inst.stage2=hd:LABEL=rtxOS:/ rescue vga=791 modprobe.blacklist=nouveauinitrdefi /images/pxeboot/initrd.img
}
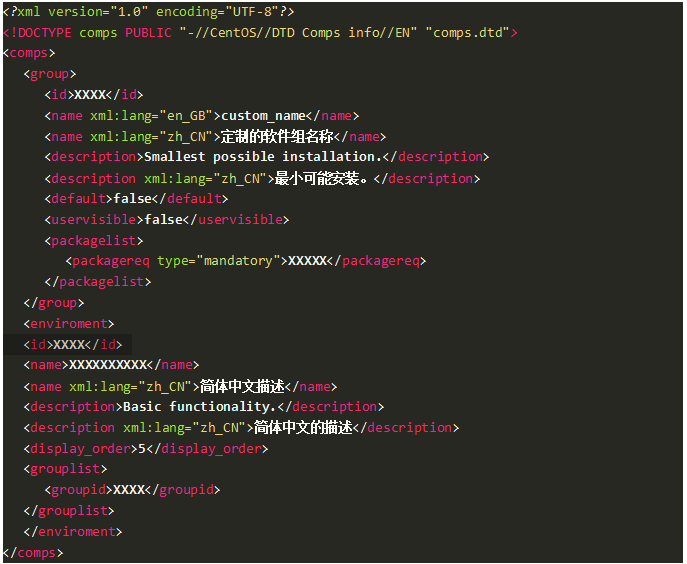
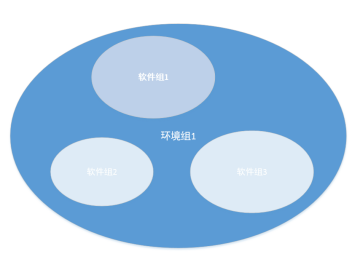
定制 修改 XML 配置文件: 阅红帽子的官方资料后得知,XXXX-minimal-x86_64-comps.xml 即为定义软件组的XML控制文件,XML中存放着软件包的语言,描述,名字;环境组,软件组等等信息
eg: 简化后的 软件组环境组的基本结构如下:
一个环境组中可以包含多个软件组
软件包组:包含需要安装的 RPM 包的名称列表
环境包组:包含需要安装的软件包组的名称
使用tab 缩进4个字符!!
定义软件组:(软件组包含需要的RPM包列表)
<group> 代表定义一个软件组<id>XXXX</id> 软件组的检索字段<name xml:lang="en_GB">custom_name</name> 软件组的英文基本名称,自行编写<name xml:lang="zh_CN">定制的软件组名称</name> 软件组的中文基本名称,自行编写<description>Smallest possible installation.</description> 软件组的英文的基本描述,自行编写<description xml:lang="zh_CN">最小可能安装。</description> 软件组的支持中文的基本描述,自行编写<default>false</default> 是否为默认,一般保持默认不用更改<uservisible>false</uservisible> 是否用户可见,一般保持默认不用更改<packagelist> RPM包列表,XML固定语法写法<packagereq type="mandatory">XXXXX</packagereq> 需要的RPM包在这里定义,XXXXX为rpm包名称;其中 type 字段有三类,default(默认的) ,mandatory(强制的) ,optional(可选的)可选的包一般不会进行安装 </packagelist> XML 语法写法</group> XML语法写法定义环境组:(环境组包含了需要的软件组)
<enviroment>  定义一个环境组<id>XXXX</id>  环境组检索字段<name>XXXXXXXXXX</name>  环境组名称,自行编写<name xml:lang="zh_CN">简体中文描述</name>  环境组名称的基本名称,自行编写<description>Basic functionality.</description>  环境组的英文基本描述,自行编写<description xml:lang="zh_CN">简体中文的描述</description>  环境组的支持中文的基本描述,自行编写<display_order>5</display_order>  显示顺序,一般不用更改<grouplist>  声明使用哪些软件组,自行编写<groupid>XXXX</groupid>  需要的软件组的名称</grouplist>  XML语法固定写法
</enviroment>  XML语法固定写法
软件组与环境组关系如下:
重建包依赖 repo 数据库:
上述修改后,使用 createrepo 工具 重新基于上面的 XML 重新生成 repodata 下面的 RPM 包的依赖关系数据库 保存到 ISO 构建的本地路径下
Anaconda Installer 的定制开发:
Anaconda 安装器简介 Anaconda 安装器是 RHEL,CentOS,Fedora 发行版的操作系统安装器,采用python语言编写; Anaconda是在ISO加载完内核 vmlinuz与临时的 initrd.img 完成初始化后,chroot 后切换到安装器所在的真实 rootfs 文件系统然后调用 /usr/sbin/anaconda 住入库启动; 安装器的文件系统是运行在内存中的,最小的内存需求为大于等于1536 MB,否则 GUI 的 Ananconda 安装器无法初始化,只能进入text (文本模式)安装模式;
土办法修改:
Anaconda 安装器是包在 ISO 文件的 LiveOS 目录下的 squashf.img中一组 python 程序,其中LiveOS 下的squashfs.img 是可以解压进行修改,重新打包;所以也可以用来做定制;
可以在 LIVE rootfs 中进行厂商信息修改,或者添加缺少命令工具的话可以利用 yum install XXXXX --installroot=XXXXX 补全部分缺少的命令工具;
最后修改完成后安装 解压 squashfs.img 的逆操作全部反过来操作就行
当然也可以用原厂开源的专用制作工具进行定制开发修改 关键命令行工具说明:
- mock:创建干净构建环境 使用 mock build RPM
- rpmbuild:RPM 包构建工具
- createrepo:创建YUM仓库
- lorax:红帽子系列发行版的 OS 官方镜像构建工具
- pungi:Fedora/CentOS 镜像构建工具
- mkisofs/genisoimage:ISO 镜像创建工具
- Anaconda:红帽子系列发行版的 OS 安装程序器
X86_64 处理器架构对应的 7.x KE linux 定制版 lorax 修改点如下: 说明 lorax 主要修改的配置文件模板的路径为: /usr/share/lorax/
/usr/share/lorax/runtime-install.tmpl: 安装配置 anaconda liveos 的主配置文件
/usr/share/lorax/runtime-postinstall.tmpl: 安装完基础的 OS 后额外配置的入口配置文件
/usr/share/lorax/runtime-cleanup.tmpl: 安装完成后执行清理的配置文件
/usr/share/lorax/x86.tmpl: 最后阶段生成对应架构的 ISO 的模板文件
/usr/share/lorax/config_files/common: 存放模板配置文件的 目录
修改新增原有 anaconda 安装器缺少的功能:
不能执行 ipmitool 设置带外
缺少部分编辑器,压缩,解压,下载工具
缺少调试日志用的网络连接
ssh 功能被禁用
增加集成阵列卡的识别管理工具
增加自由品牌厂商的定制化安装信息, LOGO , 自定义安装类 (installclass),
自定义 systemd 服务 等等
自定义安装类说明:
配置安装类存放目录 /usr/lib64/python2.7/site-packages/pyanaconda/installclasses/
分析: 通过解压 公版的 suqashfs.img rootfs 根,解读下面的 /.buildstamp 中的配置定义推测
[Main]
Product=centos
Version=7
BugURL=xxxxxxx
IsFinal=True
UUID=202011251613
[Compose]
Lorax=19.7.19-xxx
厂商信息为 product=XXX 定义的,其中 XXX 为修改后的自定义的厂商信息; 修改此处要在 rootfs 的 /usr/lib64/python2.7/site-packages/pyanaconda/installclasses/ 里面添加修改对应的包含 product=XXX 字段的 install_class 的方法,否则安装器会出现奔溃报错 厂商自定义的安装类参考 centos.py 的写法:
#
# rhel.py
#
# Copyright (C) 2010  Red Hat, Inc.  All rights reserved.
#
# This program is free software; you can redistribute it and/or modify
# it under the terms of the GNU General Public License as published by
# the Free Software Foundation; either version 2 of the License, or
# (at your option) any later version.
#
# This program is distributed in the hope that it will be useful,
# but WITHOUT ANY WARRANTY; without even the implied warranty of
# MERCHANTABILITY or FITNESS FOR A PARTICULAR PURPOSE.  See the
# GNU General Public License for more details.
#
# You should have received a copy of the GNU General Public License
# along with this program.  If not, see <http://www.gnu.org/licenses/>.
#import os
import logging
log = logging.getLogger("anaconda")from pyanaconda.installclass import BaseInstallClass
from pyanaconda.product import productName
from pyanaconda import network
from pyanaconda import nm
from pyanaconda import iutil
from pyanaconda.kickstart import getAvailableDiskSpace
from blivet.partspec import PartSpec
from blivet.platform import platform
from blivet.devicelibs import swap
from blivet.size import Size__all__ = ["RHELBaseInstallClass", "RHELAtomicInstallClass"]class RHELBaseInstallClass(BaseInstallClass):name = "CentOS Linux"sortPriority = 20001if not productName.startswith("CentOS"):hidden = TruedefaultFS = "xfs"bootloaderTimeoutDefault = 5ignoredPackages = ["ntfsprogs", "reiserfs-utils", "hfsplus-tools"]installUpdates = False_l10n_domain = "comps"efi_dir = "centos"help_placeholder = "CentOSPlaceholder.html"help_placeholder_with_links = "CentOSPlaceholderWithLinks.html"def configure(self, anaconda):BaseInstallClass.configure(self, anaconda)def setNetworkOnbootDefault(self, ksdata):if any(nd.onboot for nd in ksdata.network.network if nd.device):return# choose the device used during installation# (ie for majority of cases the one having the default route)dev = network.default_route_device() \or network.default_route_device(family="inet6")if not dev:return# ignore wireless (its ifcfgs would need to be handled differently)if nm.nm_device_type_is_wifi(dev):returnnetwork.update_onboot_value(dev, True, ksdata=ksdata)def __init__(self):BaseInstallClass.__init__(self)class RHELAtomicInstallClass(RHELBaseInstallClass):name = "CentOS Atomic Host"sortPriority=21001hidden = not productName.startswith(("CentOS Atomic Host", "CentOS Linux Atomic"))def __init__(self):self.localemap = {} # loaded lazilyRHELBaseInstallClass.__init__(self)def setDefaultPartitioning(self, storage):autorequests = [PartSpec(mountpoint="/", fstype=storage.defaultFSType,size=Size("3GiB"), maxSize=Size("15GiB"), grow=True, lv=True,thin=True, encrypted=True)]bootreqs = platform.setDefaultPartitioning()if bootreqs:autorequests.extend(bootreqs)disk_space = getAvailableDiskSpace(storage)swp = swap.swapSuggestion(disk_space=disk_space)autorequests.append(PartSpec(fstype="swap", size=swp, grow=False,lv=True, encrypted=True))for autoreq in autorequests:if autoreq.fstype is None:if autoreq.mountpoint == "/boot":autoreq.fstype = storage.defaultBootFSTypeautoreq.size = Size("300MiB")else:autoreq.fstype = storage.defaultFSTypestorage.autoPartitionRequests = autorequestsdef filterSupportedLangs(self, ksdata, langs):self._initialize_localemap(ksdata.ostreesetup.ref,ksdata.ostreesetup.url)for lang in langs:if lang in self.localemap:yield langdef filterSupportedLocales(self, ksdata, lang, locales):self._initialize_localemap(ksdata.ostreesetup.ref,ksdata.ostreesetup.url)supported = []if lang in self.localemap:for locale in locales:stripped = self._strip_codeset_and_modifier(locale)if stripped in self.localemap[lang]:supported.append(locale)return supporteddef _initialize_localemap(self, ref, repo):if self.localemap:return# fallback to just en_US in case of errorsself.localemap = { "en": ["en_US"] }# Let's only handle local embedded repos for now. Anyway, it'd probably# not be very common to only override ostreesetup through kickstart and# still want the interactive installer. Though to be nice, let's handle# that case.if not repo.startswith("file://"):log.info("ostree repo is not local; defaulting to en_US")return# convert to regular UNIX pathrepo = repo[len("file://"):]iutil.mkdirChain(os.path.join(repo, "tmp/usr/lib"))rc = iutil.execWithRedirect("/usr/bin/ostree",["checkout", "--repo", repo, ref,"--subpath", "/usr/lib/locale/locale-archive","install/ostree/tmp/usr/lib/locale"])if rc != 0:log.error("failed to check out locale-archive; check program.log")returnfor line in iutil.execReadlines("/usr/bin/localedef",["--prefix", os.path.join(repo, "tmp"),"--list-archive"]):line = self._strip_codeset_and_modifier(line)(lang, _) = line.split('_')if lang not in self.localemap:self.localemap[lang] = [line]else:self.localemap[lang].append(line)@staticmethoddef _strip_codeset_and_modifier(locale):if '@' in locale:locale = locale[:locale.find('@')]if '.' in locale:locale = locale[:locale.find('.')]return locale
其中我们需要修改点需要基于本身的 centos.py 拷贝一份新的命名为 xxxx.py 再进行修改;
需要修改为 RHELBaseInstallClass 与 RHELAtomicInstallClass 两个类中的厂商信息 productName 变量,这个信息字段为 /.buildstamp 中 product= 后面的字段
分析 centos.py 安装类的导入函数时,可以看到 productName 是从 pyanaconda.product 里面导入的
检查 /usr/lib64/python2.7/site-packages/pyanaconda/product.py 代码逻辑如下:
#
# product.py: product identification string
#
# Copyright (C) 2003  Red Hat, Inc.  All rights reserved.
#
# This program is free software; you can redistribute it and/or modify
# it under the terms of the GNU General Public License as published by
# the Free Software Foundation; either version 2 of the License, or
# (at your option) any later version.
#
# This program is distributed in the hope that it will be useful,
# but WITHOUT ANY WARRANTY; without even the implied warranty of
# MERCHANTABILITY or FITNESS FOR A PARTICULAR PURPOSE.  See the
# GNU General Public License for more details.
#
# You should have received a copy of the GNU General Public License
# along with this program.  If not, see <http://www.gnu.org/licenses/>.
#import ConfigParser
import osfrom pyanaconda.i18n import _# First, load in the defaults.  In order of precedence:  contents of
# .buildstamp, environment, stupid last ditch hardcoded defaults.
config = ConfigParser.ConfigParser()
config.add_section("Main")
config.set("Main", "Arch", os.environ.get("ANACONDA_PRODUCTARCH", os.uname()[4]))
config.set("Main", "BugURL", os.environ.get("ANACONDA_BUGURL", "your distribution provided bug reporting tool"))
config.set("Main", "IsFinal", os.environ.get("ANACONDA_ISFINAL", "false"))
config.set("Main", "Product", os.environ.get("ANACONDA_PRODUCTNAME", "anaconda"))
config.set("Main", "UUID", "")
config.set("Main", "Version", os.environ.get("ANACONDA_PRODUCTVERSION", "bluesky"))# Now read in the .buildstamp file, wherever it may be.
config.read(["/.buildstamp", "/tmp/product/.buildstamp", os.environ.get("PRODBUILDPATH", "")])# Set up some variables we import throughout, applying a couple transforms as necessary.
bugUrl = config.get("Main", "BugURL")
isFinal = config.getboolean("Main", "IsFinal")
productArch = config.get("Main", "Arch")
productName = config.get("Main", "Product")
if productName.endswith(" Alternate Architectures"):productName = productName[:-len(" Alternate Architectures")]
productStamp = config.get("Main", "UUID")
productVersion = config.get("Main", "Version")if not productArch and productStamp.index(".") != -1:productArch = productStamp[productStamp.index(".")+1:]
if productVersion == "development":productVersion = "rawhide"def distributionText():return _("%(productName)s %(productVersion)s INSTALLATION") % \{"productName": productName, "productVersion": productVersion}def translated_new_install_name():return _("New %(name)s %(version)s Installation") % \{"name" : productName, "version" : productVersion}
修改后的自定义的 xxxxos.py 安装类配置方法 , 比如定义为 rtxos.py
#
# rhel.py
#
# Copyright (C) 2010  Red Hat, Inc.  All rights reserved.
#
# This program is free software; you can redistribute it and/or modify
# it under the terms of the GNU General Public License as published by
# the Free Software Foundation; either version 2 of the License, or
# (at your option) any later version.
#
# This program is distributed in the hope that it will be useful,
# but WITHOUT ANY WARRANTY; without even the implied warranty of
# MERCHANTABILITY or FITNESS FOR A PARTICULAR PURPOSE.  See the
# GNU General Public License for more details.
#
# You should have received a copy of the GNU General Public License
# along with this program.  If not, see <http://www.gnu.org/licenses/>.
#from pyanaconda.installclass import BaseInstallClass
from pyanaconda.product import productName
from pyanaconda import network
from pyanaconda import nm
from pyanaconda.kickstart import getAvailableDiskSpace
from blivet.partspec import PartSpec
from blivet.platform import platform
from blivet.devicelibs import swap
from blivet.size import Sizeclass RHELBaseInstallClass(BaseInstallClass):name = "rtxOS Linux"sortPriority = 20002if not productName.startswith("rtxOS"):hidden = TruedefaultFS = "xfs"bootloaderTimeoutDefault = 5ignoredPackages = ["ntfsprogs", "reiserfs-utils", "hfsplus-tools"]installUpdates = False_l10n_domain = "comps"efi_dir = "centos"help_placeholder = "CentOSPlaceholder.html"help_placeholder_with_links = "CentOSPlaceholderWithLinks.html"def configure(self, anaconda):BaseInstallClass.configure(self, anaconda)self.setDefaultPartitioning(anaconda.storage)def setNetworkOnbootDefault(self, ksdata):if any(nd.onboot for nd in ksdata.network.network if nd.device):return# choose the device used during installation# (ie for majority of cases the one having the default route)dev = network.default_route_device() \or network.default_route_device(family="inet6")if not dev:return# ignore wireless (its ifcfgs would need to be handled differently)if nm.nm_device_type_is_wifi(dev):returnnetwork.update_onboot_value(dev, "yes", ksdata)def __init__(self):BaseInstallClass.__init__(self)class RHELAtomicInstallClass(RHELBaseInstallClass):name = "rtxOS Atomic Host"sortPriority=21001hidden = not productName.startswith(("rtxOS Atomic Host", "rtxOS Linux Atomic"))def setDefaultPartitioning(self, storage):autorequests = [PartSpec(mountpoint="/", fstype=storage.defaultFSType,size=Size("1GiB"), maxSize=Size("3GiB"), grow=True, lv=True)]bootreqs = platform.setDefaultPartitioning()if bootreqs:autorequests.extend(bootreqs)disk_space = getAvailableDiskSpace(storage)swp = swap.swapSuggestion(disk_space=disk_space)autorequests.append(PartSpec(fstype="swap", size=swp, grow=False,lv=True, encrypted=True))for autoreq in autorequests:if autoreq.fstype is None:if autoreq.mountpoint == "/boot":autoreq.fstype = storage.defaultBootFSTypeautoreq.size = Size("300MiB")else:autoreq.fstype = storage.defaultFSTypestorage.autoPartitionRequests = autorequests
注意:
自定义的安装类的 sortPriority 的值需要大于 20000 才会优先加载并启动运行
efi_dir 目录的名字,不要修改成 productName 变量的值,否则会出现 EFI 模式安装完成系统后,安装 EFI 引导文件失败的问题,
原因是公版的 CentOS 发行版中,grub2-efi-x64-2.02-0.81.el7.centos.x86_64.rpm 包中包含的引导项的默认 efi_dir 的值为 centos ,所以如果这里改成厂商定义的其他值会导致 EFI 引导文件无法写入,所以系统也就无法引导;
除非拿到 grub2-efi SRPM 源码进行修改,再重新打包成二进制 RPM 包,否则不推荐修改这里
修改 anaconda 制作的配置模板:
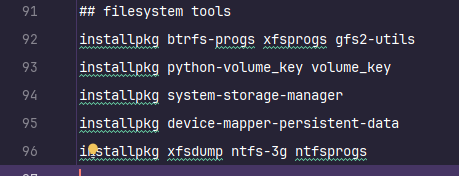
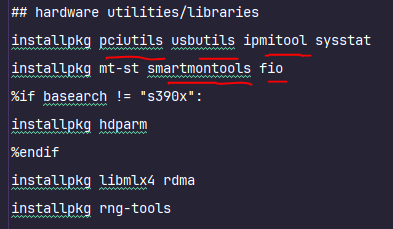
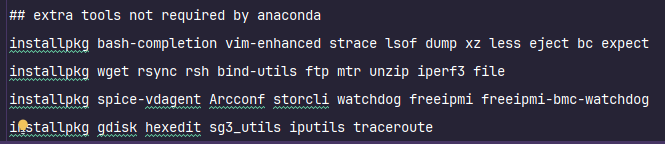
修改 /usr/share/lorax/runtime-install.tmpl : 增加部分需要的安装包
filesystem tools 里面
增加了 ntfs-3g ntfsprogs RPM 包用于支持 ntfs 格式文件系统的读写
hardware utility 中增加了:硬盘检测工具, ipmi 带内带外工具
extra tools 中增加如下工具 (vim less bc wget unzip iperf 等):
net/server tools 里面新增 :
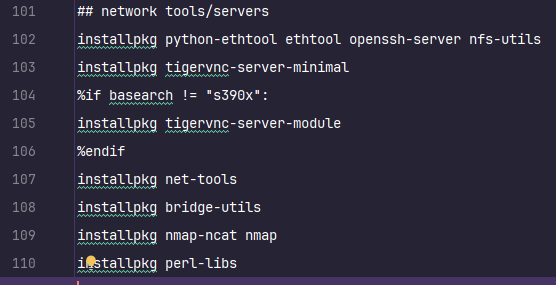
修改 /usr/share/lorax/runtime-postinstall.tmpl: 调整运行的时区为 UTC+8 shanghai 时区

安装增加下面的 OEM 定制化厂商信息, 比如 rtx
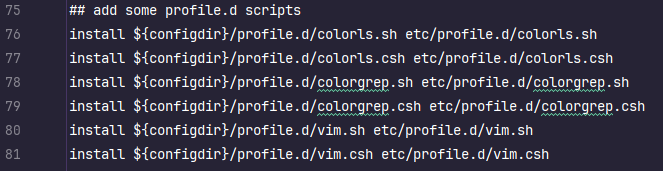
增加部分安装器 bash shell 使用的 环境变量配置模板
增加自定义的服务

. tmpl 配置文件中的语法说明:
- 大部分语法与构建 RPM 包的 SPEC 中的语法类似
- ${xxxx} 中的变量使用预定义好的模板的参数赋值
installclasses 路径: /usr/lib64/python2.7/site-packages/pyanaconda/installclasses/
服务器上的路径 : /usr/share/lorax/config_files/common/ 等于 runtime-postinstall.tmpl 文件中 ${configdir} 变量所指的路径
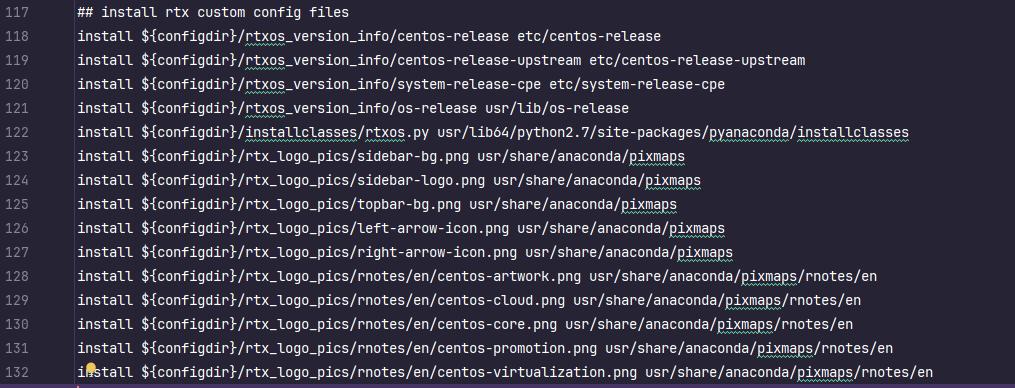
anaconda GUI 背景图替换文件路径 :
/usr/share/anaconda/pixmaps/ 替换原有的 sidebar-bg.png sidebar-logo.png topbar-bg.png
/usr/share/anaconda/pixmaps/rnotes/en 路径下:
centos-artwork.png
centos-cloud.png
centos-cloud.png
centos-core.png
centos-promotion.png
centos-virtualization.png
制作并输出新的 anaconda 安装器:
参数说明 :
最后的 /home/new_anaconda/ 代表制作新输出的 anaconda boot.iso 的根目录路径(输出目录不能先存在,否则会提示报错)
-p 代表 product name
-r 代表 release version
-v 代表 version identifier
-s 代表 软件仓库的 URL 地址, 可用网上的开源镜像站的源,也可以换成自己搭建维护的 http 仓库源
--isfinal 表示构建最终用于发布的 anaconda build 版本
CMD:
lorax -p 'rtxOS' -v '7' -r '9' -s "http://192.168.2.24/ISO_TREE_REPO/CentOS-7-x86_64-Everything-2207-02/" $(pwd)/new_anaconda/ --isfinal

替换打包 ISO 根目录中的同名同路径资源文件:
#!/bin/bashanaconda_path=/mnt/workspace/new_anaconda
target_path=/mnt/workspace/RTX_ISO_ROOT/bin/cp -fa ${anaconda_path:?}/.discinfo ${target_path:?}/
/bin/cp -fa ${anaconda_path:?}/.treeinfo ${target_path:?}//bin/cp -fa ${anaconda_path:?}/isolinux/vmlinuz ${target_path:?}/isolinux/vmlinuz
/bin/cp -fa ${anaconda_path:?}/isolinux/initrd.img ${target_path:?}/isolinux/initrd.img
/bin/cp -fa ${anaconda_path:?}/images/pxeboot/vmlinuz ${target_path:?}/images/pxeboot/vmlinuz
/bin/cp -fa ${anaconda_path:?}/images/pxeboot/initrd.img ${target_path:?}/images/pxeboot/initrd.img
/bin/cp -Rfa ${anaconda_path:?}/LiveOS ${target_path:?}/
最终打包输出: 根据需求,镜像需要支持存放大于4GB的单个文件,所以参考 genisoimage 的 man 文件后,外加参考红帽子提供的资料
打包ISO的命令参数如下:
#!/bin/bash #CURRENT_PATH=$(pwd)
ISO_SOURCE=/mnt/workspace/RTX_ISO_ROOT/
ISO_PATH="isolinux"
ISO_FORMAT="-no-emul-boot -boot-load-size 4 -boot-info-table"
echo ""para=$1
if [ -z ${para} ];thenread -p " Please Make A Name For ISO : " name
elsename=${para}
fiif [ -z $name ];thenname="biubiubiu_rtx9090_os_custom_$(uname -m)_$(date +"%Y%m%d")_7.9"
ficd "$ISO_SOURCE" || exit 1#### make iso
genisoimage  -U -r -v -T -J -udf -joliet-long -V "rtxOS" -volset "rtxOS" -A "rtxOS" \
-o /mnt/workspace/${name}.iso -c ${ISO_PATH}/boot.cat -b ${ISO_PATH}/isolinux.bin ${ISO_FORMAT} \
-eltorito-alt-boot -e images/efiboot.img -allow-limited-size -no-emul-boot ${ISO_SOURCE}#### insert md5 checksum
implantisomd5 /mnt/workspace/${name}.iso
#### make to hybrid boot
isohybrid -v /mnt/workspace/${name}.iso
[ $? = 0 ] && echo -e "\n ${name}.iso generate complete !! \n"
参数 -U -r -v -T -J -udf -joliet-long 含义为:不翻译文件名,生成 RockRidge 目录信息,可视化的,给系统无法理解的长文件名生成转换表信息,生成 Joliet 目录信息,使用UDF格式(支持大于4GB的文件),允许 Joliet 文件名的达到 103 个 unicode 字符。
参数 -V "rtxOS" -volset "rtxOS" -A "rtxOS" 表示生成 ISO 的卷名称标签(label)为: ‘rtxOS’
参数 -o /mnt/workspace/${name}.iso 表示输出 ISO 文件到 /mnt/workspace/ 下
参数 -c isolinux/boot.cat -b isolinux/isolinux.bin 表示使用ISO打包目录中 isolinux目录下的 boot.cat 与 isolinux.bin 两个固件引导 BIOS 模式
参数 -eltorito-alt-boot -e images/efiboot.img 表示使用ISO 打包目录中的 image/efiboot.img 引导EFI 模式
参数 -allow-limited-size -no-emul-boot 表示允许限制尺寸,非模拟启动
参数 $ISO_SOURCE 代表制作 ISO 的打包根目录路径
ISO 安装测试:
BIOS 模式:
UEFI 模式: