一、并发请求实现
1、多线程实现并发


from concurrent.futures import ThreadPoolExecutor
import requests
import timedef task(url):response=requests.get(url)print(url,response)pool=ThreadPoolExecutor(7)url_list=['https://www.baidu.com','https://www.zhihu.com','https://www.sina.com','https://www.autohome.com','https://www.bing.com','https://www.cnblogs.com','https://huaban.com/favorite/beauty'
]for url in url_list:pool.submit(task,url)
pool.shutdown(wait=True)
**可以实现并发,但是请求发送出去和返回之前,线程是空闲的
2、多线程并发方式2
from concurrent.futures import ThreadPoolExecutor
import requests
import timedef task(url):response=requests.get(url)return response
def done(future,*args,**kwargs):response=future.result()print(response.status_code,response.content)pool=ThreadPoolExecutor(7)url_list=['https://www.baidu.com','https://www.zhihu.com','https://www.sina.com','https://www.autohome.com','https://www.bing.com','https://www.cnblogs.com','https://huaban.com/favorite/beauty'
]for url in url_list:v=pool.submit(task,url)v.add_done_callback(done)pool.shutdown(wait=True)
**把任务分成获取返回值和回调两步,耦合要低点
小结,两种编写方式:
1直接处理
2通过回调函数处理
3、多进程方式的并发
只需要修改这两行
from concurrent.futures import PocessPoolExecutor
...
pool=ProcessPoolExecutor(7)
线程和进程的区别
多个线程共享进程的资源
io密集型用线程,计算密集型用进程
4、协程+异步IO实现并发请求
协程的理解:一个线程做很多事情,
协程+异步IO--》实现一个线程发送N个http请求
import asyncio@asyncio.coroutine
def task():print("before...task.....")yield from asyncio.sleep(5)print('end...task.....')tasks=[task(),task()]loop=asyncio.get_event_loop()
loop.run_until_complete(asyncio.gather(*tasks))
loop.close()
*本段代码能执行,提示信息 "@coroutine" decorator is deprecated since Python 3.8, use "async def" instead
要实现并发http请求需改造,因为:
asyncio支持tcp,不支持http
https是基于tcp的,可以加以改造,自己封装http数据包
 1 import asyncio
 2
 3 @asyncio.coroutine
 4 def fetch_async(host,url='/'):
 5     print("before...",host,url)
 6     reader,writer=yield from asyncio.open_connection(host,80)
 7
 8     request_header_content="""GET %s HTTP /1.0\r\nHost:%s\r\n\r\n"""%(url,host)
 9     request_header_content=bytes(request_header_content,encoding='utf-8')
10
11     writer.write(request_header_content)
12     yield from writer.drain()
13     text=yield from reader.read()
14
15     print('end...',host,url,text)
16     writer.close()
17
18 tasks=[fetch_async("www.sina.com.cn"),
19        fetch_async("m.weibo.cn","/detail/5255105515358240")]
20
21 loop=asyncio.get_event_loop()
22 results=loop.run_until_complete(asyncio.gather(*tasks))
23 loop.close()
*执行请求返回400的错误提示。
4.1、asyncio的用法
asyncio是Python3.4版本引入的标准库,直接内置了对异步IO的支持
asyncio的编程模型就是一个消息循环。asyncio模块内部实现了EventLoop,把需要执行的协程扔到EventLoop中执行,就实现了异步IO。
用asyncio提供的@asyncio.coroutine可以把一个generator标记为coroutine类型,然后在coroutine内部用yield from调用另一个coroutine实现异步操作。
为了简化并更好地标识异步IO,从Python 3.5开始引入了新的语法async和await,可以让coroutine的代码更简洁易读。
1 import asyncio
2
3 async def hello():
4     print("Hello world!")
5     await asyncio.sleep(1)
6     print("Hello again!")
7
8 asyncio.run(hello())
async把一个函数变成coroutine类型,我们就把这个async函数仍到asyncio.run()中执行。结果如下,执行间隔1s

hello()会首先打印出Hello world!,然后,await语法可以让我们方便地调用另一个async函数。由于asyncio.sleep()也是一个async函数,所以线程不会等待asyncio.sleep(),而是直接中断并执行下一个消息循环。当asyncio.sleep()返回时,就接着执行下一行语句。
把asyncio.sleep(1)看成是一个耗时1秒的IO操作,在此期间,主线程并未等待,而是去执行EventLoop中其他可以执行的async函数了,因此可以实现并发执行
!!修改案例,让两个hello()同时并发执行
import asyncio
import threading
async def hello(name):print("Hello %s! (%s)!"%(name,threading.current_thread))await asyncio.sleep(1)print("Hello %s again!(%s)!"%(name,threading.current_thread))return name#用asyncio.gather()同时调度多个async函数
async def main():L=await asyncio.gather(hello("Bob"),hello("Mark"))print(L)asyncio.run(main())
结果如下:
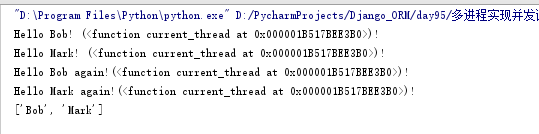
从结果可知,用asyncio.run()执行async函数,所有函数均由同一个线程执行。两个hello()是并发执行的,并且可以拿到async函数执行的结果(即return的返回值)
!!修改案例,实现异步发送网络请求
import asyncio
async def wget(host):print(f"wget {host}...")# 连接80端口:reader, writer = await asyncio.open_connection(host, 80)# 发送HTTP请求:header = f"GET / HTTP/1.0\r\nHost: {host}\r\n\r\n"writer.write(header.encode("utf-8"))await writer.drain()# 读取HTTP响应:while True:line = await reader.readline()if line == b"\r\n":breakprint("%s header > %s" % (host, line.decode("utf-8").rstrip()))# Ignore the body, close the socket
    writer.close()await writer.wait_closed()print(f"Done {host}.")async def main():await asyncio.gather(wget("www.sina.com.cn"), wget("www.sohu.com"), wget("www.163.com"))asyncio.run(main())
4.2、aiohttp的使用
aiohttp模块:封装了http数据包
安装:pip3 install aiohttp
使用asyncio+aiohttp实现并发请求
import asyncio,aiohttp@asyncio.coroutine
def fetch_async(url):print(url)response=yield from aiohttp.ClientSession().get(url)#response=yield from aiohttp.request('GET',url)print(url,response)response.close()tasks=[fetch_async("http://www.sina.com.cn"),fetch_async("http://www.chouti.com")]event_loop=asyncio.get_event_loop()
results=event_loop.run_until_complete(asyncio.gather(*tasks))
event_loop.close()
*执行**不能自动关闭,有提示Unclosed client session
asyncio可以实现单线程并发IO操作。如果仅用在客户端,发挥的威力不大。如果把asyncio用在服务器端,例如Web服务器,由于HTTP连接就是IO操作,因此可以用单线程+async函数实现多用户的高并发支持
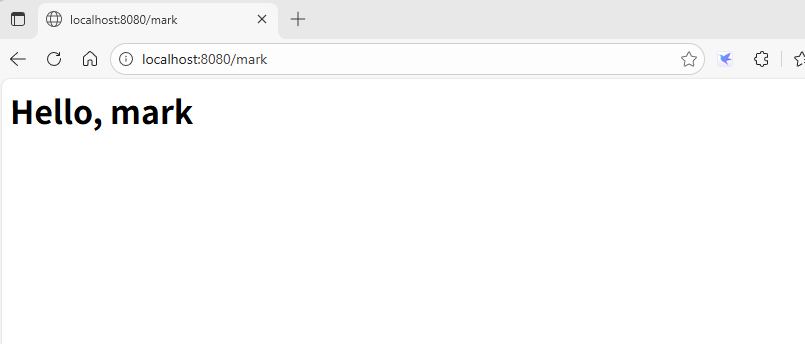
额外案例:编写http服务器。
from aiohttp import webasync def index(request):text = "<h1>Index Page</h1>"return web.Response(text=text, content_type="text/html")async def hello(request):name = request.match_info.get("name", "World")text = f"<h1>Hello, {name}</h1>"return web.Response(text=text, content_type="text/html")app = web.Application()# 添加路由:
app.add_routes([web.get("/", index), web.get("/{name}", hello)])if __name__ == "__main__":web.run_app(app)

执行后,从浏览器访问
4.3、使用asyncio+aiohttp实现并发请求
import asyncio,requests@asyncio.coroutine
def fetch_async(func,*args):loop=asyncio.get_event_loop()future=loop.run_in_executor(None,func,*args)response=yield from futureprint(response.url,response.content)tasks=[fetch_async(requests.get,"http://www.sina.com.cn"),fetch_async(requests.get,"http://www.chouti.com")]loop=asyncio.get_event_loop()
results=loop.run_until_complete(asyncio.gather(*tasks))
loop.close()
*执行后,访问chouti.com有超时提示
5、使用gevent的并发
内部会依赖greenlet,这是个协程的模块,微线程
内部实现了异步IO的功能
gevent帮我们做的类似socket级别的,也要用requests发送请求
安装:
pip install greenlet
pip install gevent
示例:
import requests,gevent
from gevent import monkey
monkey.patch_all() def task(method,url,req_kwargs):print(method,url,req_kwargs)response=requests.request(method=method,url=url,**req_kwargs)print(response.url,response.content)
#发送请求##
gevent.joinall([gevent.spawn(task,method='get',url='https://www.python.org/',req_kwargs={}),gevent.spawn(task,method='get',url='https://www.yahoo.com/',req_kwargs={}),gevent.spawn(task,method='get',url='https://github.com/',req_kwargs={}),
])#执行报错循环深度的问题:RecursionError: maximum recursion depth exceeded。(版本相关原因)
import requests,gevent
from gevent import monkey
monkey.patch_all()def task(method,url,req_kwargs):print(method,url,req_kwargs)response=requests.request(method=method,url=url,**req_kwargs)print(response.url,response.content)
##发送请求(协程池控制最大协程数量)###
from gevent.pool import Pool
pool=Pool(5)
gevent.joinall([pool.spawn(task,method='get',url='https://www.python.org/',req_kwargs={}),pool.spawn(task,method='get',url='https://www.yahoo.com/',req_kwargs={}),pool.spawn(task,method='get',url='https://github.com/',req_kwargs={}),
])
解释:
通过gevent.spawn()方法创建job
通过gevent.joinall将jobs加入到协程任务队列中等待其完成,可设置超时时间
补充:继承gevent的greenlet的用法
import gevent
from gevent import monkey
from gevent import Greenlet
monkey.patch_all()class task(Greenlet):def __init__(self,name):Greenlet.__init__(self)self.name=namedef _run(self):print("Task %s:some task..."%self.name)t1=task("task1")
t2=task("task2")
t1.start()
t2.start()gevent.joinall([t1,t2])
执行结果:

5.1、grequests模块
封装实现了gevent+requests功能
安装:pip install grequests
import grequestsrequest_list=[grequests.get('https://www.python.org/',timeout=0.001),grequests.get('https://github.com/')
]#执行并获取响应列表
response_list=grequests.map(request_list)#map传size参数,为设置协程池数量,如size=5
print(response_list)