文章目录
- 阿里云百炼-实现语音克隆
- 问题1❌
- 解决方法
- 问题2❌
- 解决办法-本地跑模型
- YourTTS
- Modelscope
- ChatTTS
- ElevenLabs
- 最后权衡-解决
- CosyVoice声音复刻与合成
- 0.前提
- 1.准备工作
- 2.创建音色
- 3.轮询检查音色
- 4.语音合成
- 5.返回给前端
- 6.前端展示
- 7.成果展示
- 结语
阿里云百炼-实现语音克隆
问题1❌
遇到的第一个问题就是前端已经写好的页面,对于录音这个功能具有限制,只能是公网ip或者localhost才能进行录音,同时也要考虑好浏览器的版本问题等
这说明 浏览器确实支持 MediaRecorder,但是 navigator.mediaDevices 在你的当前环境不可用。
原因分析:不安全上下文
Chrome 要求 getUserMedia 必须在安全上下文中:HTTPS 页面或localhost
192.168.x.x 的 HTTP 地址 默认不算安全上下文,所以 navigator.mediaDevices 被禁用。这就是为什么你会看到“浏览器不支持录音功能”,尽管 MediaRecorder 本身存在。
为什么 MediaRecorder 存在但 navigator.mediaDevices 不存在
MediaRecorder 是浏览器自带的 API,可以创建录音器,但需要 getUserMedia 提供音频流。没有安全上下文,所以没法获取麦克风权限,导致 navigator.mediaDevices 被禁用。
解决方法
方案 A:改用 localhost
在本机运行开发服务器,用 http://localhost:3001 访问,而不是局域网 IP。
npm run dev然后访问 http://localhost:3001
方案 B:临时将局域网 IP 当作安全上下文
打开 Chrome:chrome://flags/#unsafely-treat-insecure-origin-as-secure
启用,并添加你的局域网 IP:http://192.168.100.1:3001
重启 Chrome。这样 navigator.mediaDevices 就可以在 HTTP 下使用了(仅开发调试用)。
方案 C:使用 HTTPS
给本地开发服务器加 HTTPS,例如用自签名证书或 mkcert:
npm run dev -- --https然后访问 https://192.168.100.1:3001。
推荐方案:开发阶段直接使用 localhost,最简单、最安全,也避免后续权限问题。
问题2❌
看了现在的大模型厂商,我没有找到可以克隆真人的模型有免费的
对比了一下通义、扣子、智谱都没有
解决办法-本地跑模型
(虽然是解决办法,但是都尝试了–没结果)
Python 接口真正克隆真人声音,并且可以和你的 Vue 前端 + Java 项目对接。整个流程尽量轻薄本可跑(CPU 版),不需要懂机器学习
但是很遗憾,我没有深入学习机器学习和大模型,而且我的轻薄本无法高效率的跑模型
YourTTS
一直依赖错误,没耐心就没记录下来素材
Modelscope
CosyVoice和CosyVoice-300M
最后一个是现在不开放了,一个是魔搭里面少启动文件…
emmmm鬼知道我俩小时下载下来的东西没有用md
# 在 cosy_env2 中执行
python -m pip install --upgrade pip
pip install torch==2.1.2+cpu torchvision==0.16.2+cpu torchaudio==2.1.2 --index-url https://download.pytorch.org/whl/cpu
pip install modelscope==1.11.0
pip install soundfile pydub flask packaging
cosy_env2\Scripts\activate
# 卸载 NumPy 2.x
pip uninstall numpy -y
# 安装兼容版本(推荐 1.26.x,PyTorch 2.1 官方支持)
pip install numpy==1.26.4
ChatTTS
完整、可直接运行的 ChatTTS 语音克隆脚本,支持:
- 中文文本合成
- 音色随机生成(可多次运行选最像你的)
- 自动保存为 MP3
- 无需 GPU,CPU 即可运行
# 激活你的环境(如果还没激活)
.\cosy_env2\Scripts\activate
# 安装 ChatTTS 及依赖
pip install ChatTTS torch torchaudio soundfile pydub scipy numpy==1.26.4
⚠️ 务必使用
numpy<2(如1.26.4),否则可能报错!
第二步:保存以下代码为 chat_tts_clone.py
# chat_tts_clone.py
import os
import torch
import ChatTTS
import numpy as np
from scipy.io.wavfile import write as write_wav
from pydub import AudioSegment
TEXT_TO_SYNTHESIZE = "你好,这是通过 ChatTTS 合成的声音,啦啦啦啦啦啦啦,我是研。"
OUTPUT_DIR = "output"
NUM_SAMPLES = 5  # 生成5个不同音色,供你挑选最像的
os.makedirs(OUTPUT_DIR, exist_ok=True)
def main():print(" 正在加载 ChatTTS 模型(首次加载较慢,请耐心等待)...")# 加载模型(Windows 建议关闭 compile)chat = ChatTTS.Chat()chat.load(compile=False)  # 关闭 torch.compile,避免 Windows 兼容问题print(f'️ 正在生成 {NUM_SAMPLES} 个不同音色的语音...')for i in range(NUM_SAMPLES):# 随机生成一个音色(每次不同)rand_spk = chat.sample_random_speaker()# 合成语音wavs = chat.infer(TEXT_TO_SYNTHESIZE,skip_refine_text=True,  # 跳过文本优化(更快)params_infer_code={'spk_emb': rand_spk})# 保存为 WAVaudio_data = wavs[0]  # shape: (n,)wav_path = os.path.join(OUTPUT_DIR, f"sample_{i+1}.wav")write_wav(wav_path, 24000, (audio_data * 32767).astype(np.int16))# 转为 MP3(更小体积)mp3_path = os.path.join(OUTPUT_DIR, f"sample_{i+1}.mp3")AudioSegment.from_wav(wav_path).export(mp3_path, format="mp3", bitrate="96k")os.remove(wav_path)  # 删除临时 WAVprint(f"✅ 已生成: {mp3_path}")print(f"\n 完成!共生成 {NUM_SAMPLES} 个语音样本。")
if __name__ == "__main__":main()
▶️ 第三步:运行脚本
python chat_tts_clone.py首次运行会自动下载模型(约 1.2GB),后续秒开。
ElevenLabs
https://elevenlabs.io/app/onboarding
国外的,没用过,不过收费挺高的
最后权衡-解决
️奋战了(虽然不太情愿说是奋战)几个多小时,我结束了在本地部署模型的想法了,我现在需要早点完成这个需求,但是模型部署这个东西,我挺感兴趣的,后面我会继续学习把模型本地部署,并且进行大模型的微调,总会成功而且被需要的
✅采用了通义的音色复刻和语言合成为什么会会有音色复刻?⏳
这也是我进过翻了很多教程网页和官网文档得出的,普通的想TTS模型,单纯的语言合成是没有复刻的感觉的,会很机器化,而进行了声音复刻就很接近“克隆”这个概念了,所以就仔细查阅了百练平台的官方文档
我的代码是基于Java和vue、ts来的声音复刻
语音合成
CosyVoice声音复刻与合成
| 版本 | 适用场景 |
|---|---|
| cosyvoice-v3-plus | 追求最佳音质与表现力,预算充足 |
| cosyvoice-v3-flash | 平衡效果与成本,综合性价比高 |
| cosyvoice-v2 | 兼容旧版或低要求场景 |
| cosyvoice-v1 | 兼容旧版或低要求场景 |
0.前提
下面是官网给出的python代码,用于介绍完整的声音复刻和合成的代码
import os
import time
import dashscope
from dashscope.audio.tts_v2 import VoiceEnrollmentService, SpeechSynthesizer
# 1. 环境准备
# 推荐通过环境变量配置API Key
# export DASHSCOPE_API_KEY="sk-xxxxxxxxxxxxxxxxxxxxxxxxxxxxxxxx"
dashscope.api_key = os.getenv("DASHSCOPE_API_KEY")
if not dashscope.api_key:
raise ValueError("DASHSCOPE_API_KEY environment variable not set.")
# 2. 定义复刻参数
TARGET_MODEL = "cosyvoice-v3-plus"
# 为音色起一个有意义的前缀
VOICE_PREFIX = "myvoice" # 仅允许数字和小写字母,小于十个字符
# 公网可访问音频URL
AUDIO_URL = "https://dashscope.oss-cn-beijing.aliyuncs.com/samples/audio/cosyvoice/cosyvoice-zeroshot-sample.wav" # 示例URL,请替换为自己的
# 3. 创建音色 (异步任务)
print("--- Step 1: Creating voice enrollment ---")
service = VoiceEnrollmentService()
try:
voice_id = service.create_voice(
target_model=TARGET_MODEL,
prefix=VOICE_PREFIX,
url=AUDIO_URL
)
print(f"Voice enrollment submitted successfully. Request ID: {service.get_last_request_id()}")
print(f"Generated Voice ID: {voice_id}")
except Exception as e:
print(f"Error during voice creation: {e}")
raise e
# 4. 轮询查询音色状态
print("\n--- Step 2: Polling for voice status ---")
max_attempts = 30
poll_interval = 10 # 秒
for attempt in range(max_attempts):
try:
voice_info = service.query_voice(voice_id=voice_id)
status = voice_info.get("status")
print(f"Attempt {attempt + 1}/{max_attempts}: Voice status is '{status}'")
if status == "OK":
print("Voice is ready for synthesis.")
break
elif status == "UNDEPLOYED":
print(f"Voice processing failed with status: {status}. Please check audio quality or contact support.")
raise RuntimeError(f"Voice processing failed with status: {status}")
# 对于 "DEPLOYING" 等中间状态,继续等待
time.sleep(poll_interval)
except Exception as e:
print(f"Error during status polling: {e}")
time.sleep(poll_interval)
else:
print("Polling timed out. The voice is not ready after several attempts.")
raise RuntimeError("Polling timed out. The voice is not ready after several attempts.")
# 5. 使用复刻音色进行语音合成
print("\n--- Step 3: Synthesizing speech with the new voice ---")
try:
synthesizer = SpeechSynthesizer(model=TARGET_MODEL, voice=voice_id)
text_to_synthesize = "恭喜,已成功复刻并合成了属于自己的声音!"
# call()方法返回二进制音频数据
audio_data = synthesizer.call(text_to_synthesize)
print(f"Speech synthesis successful. Request ID: {synthesizer.get_last_request_id()}")
# 6. 保存音频文件
output_file = "my_custom_voice_output.mp3"
with open(output_file, "wb") as f:
f.write(audio_data)
print(f"Audio saved to {output_file}")
except Exception as e:
print(f"Error during speech synthesis: {e}")
整体就是6步走
- 环境准备
- 定义复刻参数(公网可访问的音频url)
- 创建音色
- 轮询查询音色状态
- 复刻音色语音合成
- 保存音频文件
1.准备工作
获取API Key:获取API Key,为安全起见,推荐将API Key配置到环境变量。
安装SDK:确保已安装最新版DashScope SDK。
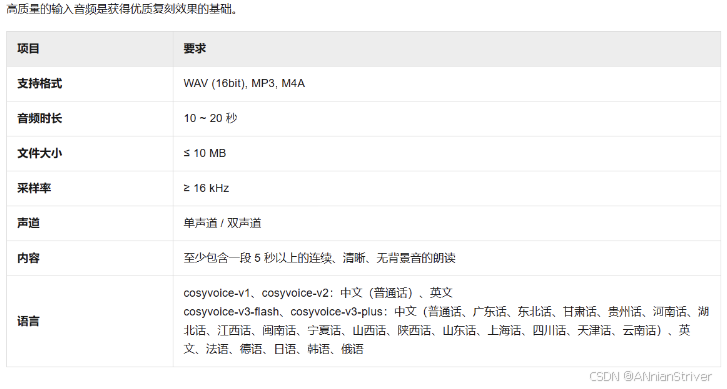
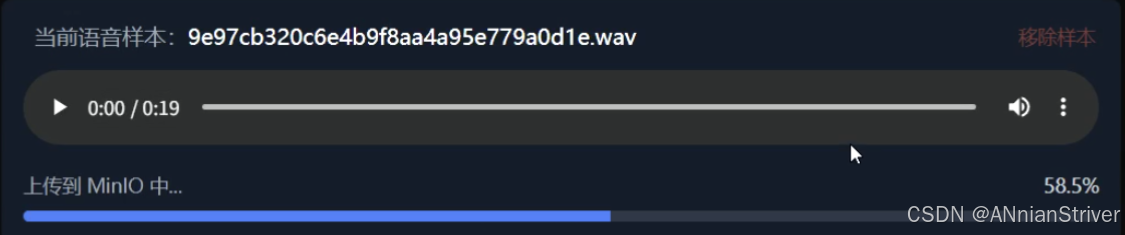
<dependency> <groupId>com.alibaba</groupId> <artifactId>dashscope-sdk-java</artifactId> <version>2.21.14</version> </dependency>准备音频URL:将符合音频要求的音频文件上传至公网可访问的位置,如阿里云对象存储OSS,并确保URL可公开访问(我在本篇博文里面想介绍的是使用Minio进行存储和获取相关链接,当然只是抛砖引玉)
2.创建音色
在官网你可以选择其他音色,种类很多,可以自己探索。
我因为是为了尽可能还原人声,所以就只是复刻自己的声音作为音色
public String clone(String voiceSampleUrl, String sampleText) {
//这里的ModelInfoEntity,是我们做的一个实体类,专门管理相关模型参数的
//比如模型名字、链接、apik等等
//不需要规范化管理而持久化到数据库的,直接定义相关变量即可,往下看
ModelInfoEntity ttsModelInfo = getTTSModelInfo();
String targetModel = ttsModelInfo.getModelCode();
String prefix = "myvoice";
try {
VoiceEnrollmentService service = new VoiceEnrollmentService(ttsModelInfo.getApiKey());
Voice myVoice = service.createVoice(
targetModel,
prefix,
voiceSampleUrl
);
return myVoice.getVoiceId();
} catch (Exception e) {
return null;
}
}
定义相关变量,参考官网
只是为了测试DASHSCOPE_API_KEY,你也可以直接定义成变量,这个就是你的阿里云apikey
public class Main {
private static final Logger logger = LoggerFactory.getLogger(Main.class);
public static void main(String[] args) {
String apiKey = System.getenv("DASHSCOPE_API_KEY");
String targetModel = "cosyvoice-v3-plus";
String prefix = "myvoice";
String fileUrl = "https://your-audio-file-url";
try {
VoiceEnrollmentService service = new VoiceEnrollmentService(apiKey);
Voice myVoice = service.createVoice(
targetModel,
prefix,
fileUrl,
/* VoiceEnrollmentParam.builder().languageHints(Collections.singletonList("en")).build());*///这一句,仅限你用的是cosyvoice-v3-flash和cosyvoice-v3-plus
logger.info("Voice creation submitted. Request ID: {}", service.getLastRequestId());
logger.info("Generated Voice ID: {}", myVoice.getVoiceId());
} catch (Exception e) {
logger.error("Failed to create voice", e);
}
}
}
3.轮询检查音色
如果你录入的音频时间太长,是需要时间的
private void waitForVoiceReady(String apiKey, String voiceId) throws Exception {
int maxAttempts = 30;
int pollInterval = 10; // 秒
VoiceEnrollmentService service = new VoiceEnrollmentService(apiKey);
for (int attempt = 0; attempt < maxAttempts; attempt++) {
try {
Voice voiceInfo = service.queryVoice(voiceId);
String status = voiceInfo.getStatus();
if ("OK".equals(status)) {
log.info("语音已准备好进行合成。");
return;
} else if ("UNDEPLOYED".equals(status)) {
throw new RuntimeException("语音处理失败,状态为: " + status);
}
Thread.sleep(pollInterval * 1000);
} catch (Exception e) {
log.error("状态轮询时出错: {}", e.getMessage());
Thread.sleep(pollInterval * 1000);
}
}
throw new RuntimeException("轮询超时,几次尝试后,声音仍未准备好.");
}
4.语音合成
下面是官网java代码
import com.alibaba.dashscope.audio.ttsv2.SpeechSynthesisParam;
import com.alibaba.dashscope.audio.ttsv2.SpeechSynthesizer;
import java.io.File;
import java.io.FileOutputStream;
import java.io.IOException;
import java.nio.ByteBuffer;
public class Main {
// 模型
private static String model = "cosyvoice-v2";
// 音色
private static String voice = "longxiaochun_v2";
public static void streamAudioDataToSpeaker() {
// 请求参数
SpeechSynthesisParam param =
SpeechSynthesisParam.builder()
// 若没有将API Key配置到环境变量中,需将下面这行代码注释放开,并将your-api-key替换为自己的API Key
// .apiKey("your-api-key")
.model(model) // 模型
.voice(voice) // 音色
.build();
// 同步模式:禁用回调(第二个参数为null)
SpeechSynthesizer synthesizer = new SpeechSynthesizer(param, null);
ByteBuffer audio = null;
try {
// 阻塞直至音频返回
audio = synthesizer.call("今天天气怎么样?");
} catch (Exception e) {
throw new RuntimeException(e);
} finally {
// 任务结束关闭websocket连接
synthesizer.getDuplexApi().close(1000, "bye");
}
if (audio != null) {
// 将音频数据保存到本地文件“output.mp3”中
File file = new File("output.mp3");
// 首次发送文本时需建立 WebSocket 连接,因此首包延迟会包含连接建立的耗时
System.out.println(
"[Metric] requestId为:"
+ synthesizer.getLastRequestId()
+ "首包延迟(毫秒)为:"
+ synthesizer.getFirstPackageDelay());
try (FileOutputStream fos = new FileOutputStream(file)) {
fos.write(audio.array());
} catch (IOException e) {
throw new RuntimeException(e);
}
}
}
public static void main(String[] args) {
streamAudioDataToSpeaker();
System.exit(0);
}
}
上面已经说了,我需要的不是官网给的音色,所以我需要将clone()方法的返回值给.voice(voice) // 音色
替换原来的本地文件保存逻辑为 MinIO 上传,这个自己随意
如果想试试可公开访问功能的同学,可以去看看我已经发布的对象存储的文章
阿里云OSS的开通+配置及其使用,进行音频文件的上传和链接获取
下面这个是我介绍自己的业务需求,对于minio的上传下载,后续我会在编辑文章来介绍
// 替换原来的本地文件保存逻辑为 MinIO 上传
if (audio != null) {
// 首次发送文本时需建立 WebSocket 连接,因此首包延迟会包含连接建立的耗时
System.out.println(
"[Metric] requestId为:"
+ synthesizer.getLastRequestId()
+ "首包延迟(毫秒)为:"
+ synthesizer.getFirstPackageDelay());
// 上传到 MinIO
String objectName = "clones/" + UUID.randomUUID() + ".mp3";
return minioUtil.upload(audio.array(), objectName, "audio/mpeg");//这里返回的就是可公开访问的链接(关于minio的上传逻辑暂时先不说了,测试语音克隆的同学可以先下载到本地,在捣鼓其他的)
} else {
return "生成克隆合成的音频错误!!!!";
}
5.返回给前端
定义了一个clone接口
CloneVoiceRequest是我定义的一个请求类,包括上传的可访问音频链接、用户输入的音频内容(可为空)、你想要克隆合成的文本(必须)
CloneVioceTaskResponse是我定义的返回给前端的响应类,包括从minio得到的文件名和文件链接
@PostMapping("/clone")
public R<CloneVioceTaskResponse> cloneVoice(@RequestBody CloneVoiceRequest request) {if (ObjectUtils.isEmpty(request)) {return R.failed("请求参数不能为空");}try {String resultUrl = voiceCloneService.cloneVoiceAndUpload(request.getVoiceSampleUrl(),request.getText(),request.getVoiceSampleContent());CloneVioceTaskResponse response = new CloneVioceTaskResponse();response.setFilename(extractFilenameFromUrl(resultUrl));response.setFilePath(resultUrl);return R.ok(response, "克隆成功!!!!!");} catch (Exception e) {log.error("声音克隆失败", e);return R.failed("声音克隆失败: " + e.getMessage());}}private String extractFilenameFromUrl(String url) {// 从URL中提取文件名int lastSlashIndex = url.lastIndexOf('/');if (lastSlashIndex != -1) {return url.substring(lastSlashIndex + 1);}return "cloned_voice.mp3";}
6.前端展示
前端我的知识就不详细说了,每个人的需求不尽相同
在ts中记录接口API
export const audioCloneService = {
async cloneVoice(params: CloneVoiceRequest): Promise<CloneVoiceResponse> {const response = await useRequest<CloneVoiceResponse>({url: '/model/voice-clone/clone',method: 'POST',body: params})console.log('克隆请求响应数据:', response)return response    // 不要写 response.data}}
前端JavaScript逻辑
import { audioCloneService } from '~/composables/api/audioClone'
const handleClone = async () => {
if (!cloneText.value.trim()) {
ElMessage.warning('请输入要克隆的文本')
return
}
if (!audioCloneStore.currentAudio || !audioCloneStore.currentAudio.url) {
ElMessage.error('请先完成语音样本的录制或上传')
currentStep.value = 0
return
}
audioCloneStore.isCloning = true
currentStep.value = 3
startCloningProgress()
try {
const params = {
text: cloneText.value.trim(),
voiceSampleUrl: audioCloneStore.currentAudio.url,
voiceSampleContent: sampleText.value.trim() || '',
}
const result = await audioCloneService.cloneVoice(params)
stopCloningProgress()
cloningProgress.value = 100
console.log('克隆结果:', result)
console.log('克隆结果文件路径:', result.filePath)
if (result===null || result.filePath === null) {
throw new Error('克隆结果不完整,请重试')
}
const clonedVoice = {
id: result.filename.split('.')[0],
text: cloneText.value.trim(),
audioUrl: result.filePath,
speakerName: audioFileName.value,
createdAt: new Date().toISOString()
}
audioCloneStore.addClonedVoice(clonedVoice)
ElMessage.success('声音克隆成功')
currentStep.value = 4
} catch (error) {
stopCloningProgress()
cloningProgress.value = 0
console.error('克隆失败:', error)
ElMessage.error(error instanceof Error ? error.message : '声音克隆失败,请重试')
currentStep.value = 2
} finally {
audioCloneStore.isCloning = false
}
}
当然前端还涉及到浏览器录音和本地文件上传,以及将前端录音音频统一音频处理流程 (录音webm转 WAV,MP3/WAV 直传),篇幅太多就不展示了,只展示和核心的调用逻辑
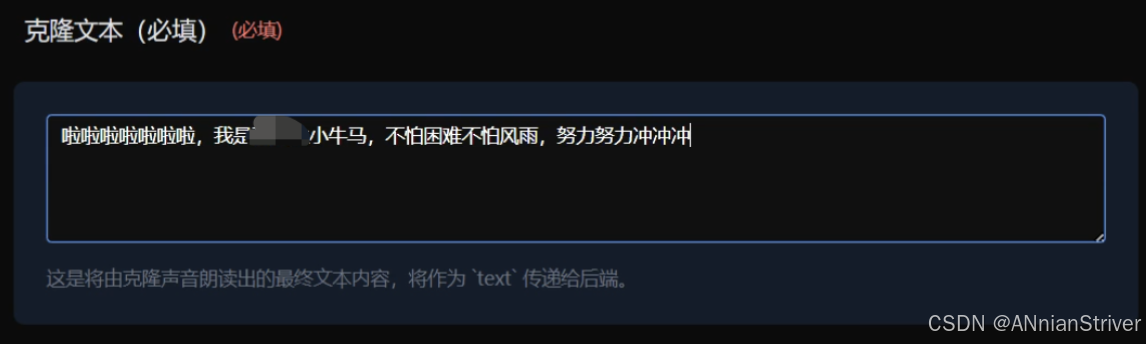
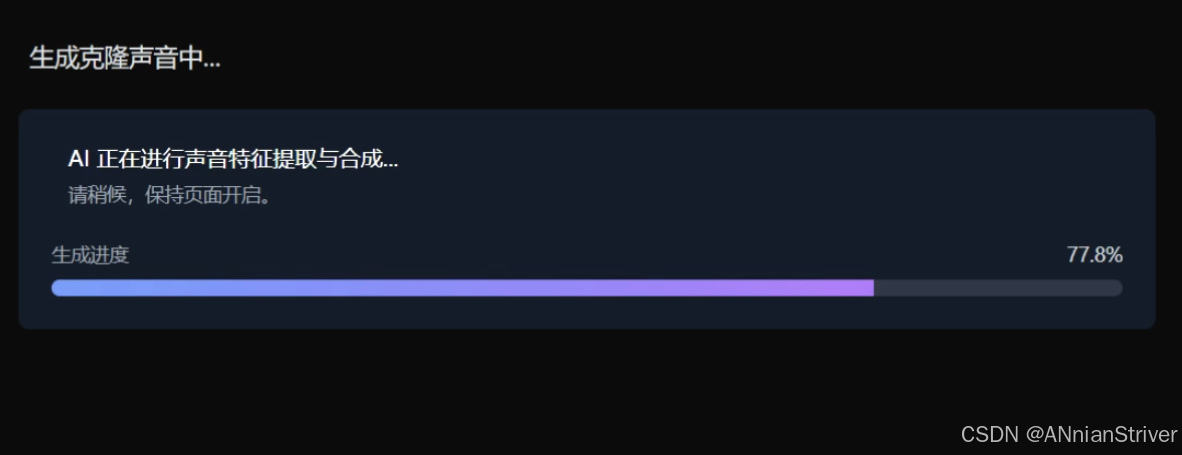
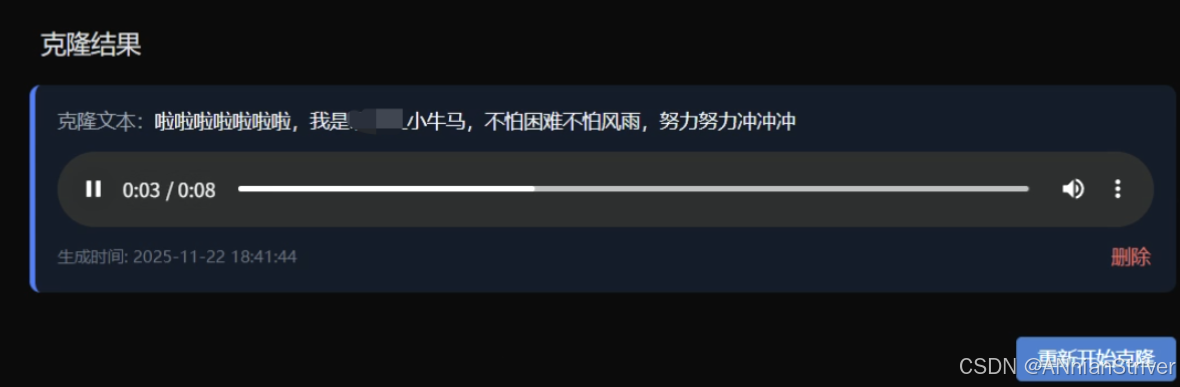
7.成果展示
结语
代码的背后都是白云苍狗,愿我们都做SUCCESS的高手!
代码成就万世基积沙镇海
梦想永在凌云意意气风发
任何执拗都会成为过往,只有时间会告诉你对错。
人们总爱说一句话:认真你就输了。
而我更相信另一句话。认输,你才真的输了